
Tropical Fishkeeping
Nothobranchius rachovi (Beira 98)
- Details
- Written by Puddlefish
- Parent Category: Articles
- Hits: 51907

Adult male - Image courtesy of igmillichip
I forget how many times folks have asked me for help with hatching annual killifish species eggs bought from Far East breeding farms via online sources such as Ebay. I hope this little scenario, which happened to me recently, helps others who have unwittingly gone down the same route and acquired eggs which they were ill equipped to cope with.
OK I usually start these threads with the sum of the whole. I usually tend to complete an opus start to finish before submitting the finished article for everyone's perusal. This time around, through a catalogue of events I'll be doing things a little differently, and logging certain (providing everything goes to plan) events on a day to day or weekly basis.
Let me give you a little background to the situation in hand. Ordinarily I would post a breeding article starting with the fish spawning, egg production, hatching, rearing of fry, so on and so forth. This time a situation was forced upon me somewhat on which I had to act.
Some time ago I was approached by a young lad who was interested in Killifish. Knowing little or nothing surrounding their care and husbandry, he proceeded, like many before him to purchase some Annual species eggs from so called Far East breeding farms. He chose Nothobranchius rachovi (Beira 98) as his first species on which to start his new found hobby. Now as we all know, or should know, Rachovi is a very colourful fish, one that will rival a lot of marine species in that respect, but in no way is it, IMHO, a beginners species. Had he contacted me sooner I would have recommended Guntheri as a species on which to cut his teeth as it were. Anyway the sceanario played itself out and finding out that he was ill prepared for their imminent hatch (no food stuffs readied) he asked would I hatch the eggs for him. Not wanting to let the chap down I duly agreed to hatch the eggs and once successfully reared I would return him a couple of pair of which he was more than delighted. This gave him the opportunity to gather more information on the subject and be better equiped next time when it's his turn to give them a go. He sent me the eggs and the story progresses from this point onward.
I received the eggs and the first thing that alarmed me was the collection and hatching dates.
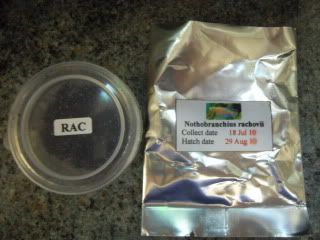
Collected 18/07/2010 - Expected 29/08/2010
Now I know enough from breeding this species many times in the past that something was more than likely amiss here as the drying period for Rachovii (although you can warm store to force the diapause to quicken) is around 4mths give or take. (check the iris within the egg sac for an indication of hatching) Not entirely happy with this information I stored the eggs for a further six weeks than what was advised on the label. (still a very short diapause for RAC) but this depends a lot on the moisture of the peat and temperature of incubation.
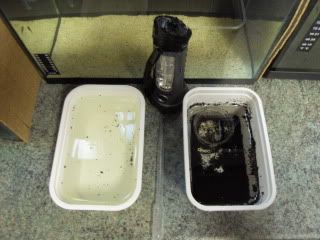
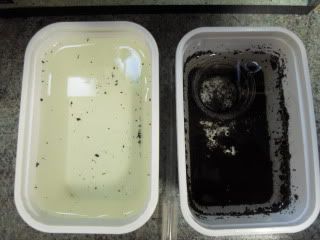
Today I decided to wet the eggs for the first time.
So I made up some coolish water (68'f) in a small margarine tub, 1/2 tapwater - 1/2 rainwater and a slight sprinkle of salt to deter velvet.
Fry began hatching almost immediately so armed with my little torch and pipette I prepared to go hunting Rachovii fry.
It was at this point I realised "My Eyesight is getting worse with age"! I had totally forgotten how small these little beggars were, especially as they had the camouflage of the peat to help them evade detection. Next out came the trusty large magnifying glass and the hunting ground became a whole lot clearer. As of one hour ago we were up to 16 fry, not a lot you might say but there are more to be caught and I've retired for this evening to resume in the morning. I have no idea how many eggs were in the peat to begin with as those Far Eastern farms are notorious for dubious practices when sending precise numbers of eggs. So we'll see how many we eventually end up with in the first batch before re drying the peat.
For now, the fry are being fed paramoecium. Annual fry need to be fed immediately upon hatching. Whilst there will be a certain amount of infusoria available via the peat they will still need a hearty meal soon after. They are too small in the first stages to accept artemia nauplii so we need to offer microscopic livefoods to get them to the next stage.
That's were we are at this present moment in time, tomorrow's another day as they say, success, failure who know's what factors will come into play as we progress. That remains to be seen.
These fry are tiny in comparison to a lot of other Notho. species I've encountered.
I will hopefully embellish this thread further with images depending on the outcome of ongoing events. Once I can get them to the brine shrimp stage then everything should be plain sailing. Fingers crossed.
--------------------------------------------------------------------------------------------------------------------------------------------------------------------------------------------------------------------------------------------------------------------------------------------------
Whilst the situation is developing please allow me to fill in some basic information surrounding this beautiful species.
Nothobranchius rachovii, belongs to the family of the Cyprinodontidae. This amazingly colourful Notho. was first discribed by by E. Ahl in 1926 and was named in honour of Arthur Rachow, a renowned pre-world war German aquarium pioneer.
There are many different strains of RAC known to the hobby today, some readily available, some fairly obscure. Most are pretty much unrecognisable from the colour pattern that we all perceive to be Nothobranchius rachovi. Although still classified as the same fish separated only by locality they bare little or no resemblance (in colour) to the "*normal coloured" Beira strain.
N. Rachovi's distribution area is pretty vast but predominately lies within and along the border areas of Mozambique with one particular location being found just across the border with South Africa.
Known populations are;
Beira 98
Kruger National Park
MOZ 03-2
MOZ 04-02 Mazimechopes River
MOZ 04-08 Lima River
MOZ 04-10 Nicuadala
MOZ 04-3
MOZ 04-9 Quelimane
MOZ 99-9
MOZ 99/1
MOZ 99/3
MZHL 05-5
Nhangau MT 03-4
This species of fish will attain a size of around 55-60 mm for the males with female remaining slightly smaller.
I wish to include (from published literature) a little description of Beira the main type locality of this species.
In Beira, the soil content of this location is made up of salty red clay the coolest temperatures (average of 22.5°C - 72°F) can be found in July. During the hottest period (November-December) the average temperature reach 27.5°C (82°F). The temporary pools will start to dry out around May or June. The rainy starts in November, and by June -July most of the pools containing RAC will have totally dried out. The eggs of coastal RAC populations incubate in semi moist soils for approximately 5-6 months (hence my concerns over the hatching dates on the eggs supplied to me albeit the diapause times would be temperature dependant).
The area around Beira is made up of a great number of swamps and marshland which in-turn generates a unique micro-climate controlled by sporadic foggy night-time clouded areas which generate early morning dew, this stops the developing eggs from fully drying out.
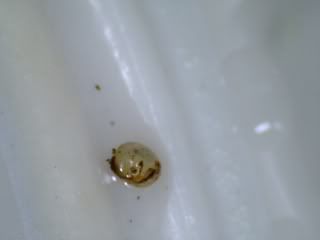
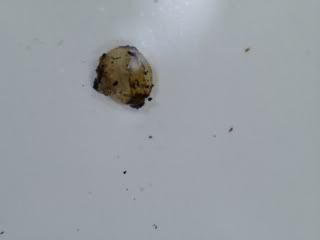
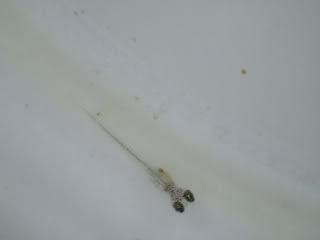
These images show a RAC egg (from this batch) with still some way to go before hatching.
There is a fair amount of cell division with skeletal formation &
if you observe the second photo closely you may just be able to locate the eye.
This egg along with any others that are left in the peat will almost certainly need a further resting period before it's time for the fully developed fry to emerge.
Often folks would often wonder what is termed by annualism or what does it mean that a specific genre or species of killifish is classed as an annual type. For the benefit of those enquiring minds I will attempt to briefly explain.
When we speak of the term annual killifish we are usually referring to a genre or species of Cyprinodontidae who's eggs require resting period in which to develop. Most annuals come from Africa and South America. They are fish that posses a very high metabolic rate. Their life-cycle is governed by climatic changes in weather patterns in their relevant geographical locations. Rains fill temporary water holes (sometimes only the size of a cattle hoof imprint) The eggs hatch out almost immediately and the tiny fry search for food. Annual species are constant eating machines and provision for a well stocked live food larder is a necessity when handling such species. They grow very fast, they have to as they will only have the time available until the hot sun dries their pool. They usually mature in around 4-6 weeks (sometimes shorter) and begin to breed, this is their sole occupation from this moment onward, (Normal lifespan for the Beira strain is between 9-12 months). At the latter end of this timescale the fish will look very ragged and a shadow of their former self.
As the pools begin to dry the egg develops normally until a specific number of cells has been reached then it will enter a resting stage or diapause (different species will have 2-3 different resting stages). These stages are again linked to the weather patterns of the area in which they live. When the rain starts to fall again the fry will hatch and start the cycle all over again. One point to note is that not all eggs will hatch at this moment incase of a premature freak storm, some eggs will be at differing stages of development and may not hatch (in the wild) until the following season. Nature has thought of everything to ensure the survival of such complex species of fish.
Must go and check these eggs and fry again.
----------------------------------------------------------------------------------------------------------------------------------------------------------------------------------------------------------------------------------------------------------------------------------------------
***Just finished checking the peat for any more hatchings and I can report another four have been transferred to the small rearing tub. That brings us up to around the twenty mark but I will keep the peat submerged for another 48 hours in-case there are any stragglers after which time I will re-dry and store the peat for a further 4-6 weeks and start this process again.
There has been no losses overnight I'm glad to say and I have performed the first of many minute water-changes using the same water make-up as before. This being agitated with 1 teaspoon of salt per 10ltrs of make-up water.
Water-changes are very, very important at this stage but they can also be fatal if you use a different chemical balance. It is good practice to make up around 10 extra litres of water specifically for use with this species when you first wet the eggs. Small and frequent daily water-changes are best, and I would only like to change around 30mls per day at this point. Later we can increase the amount of change. Always remember to keep the tubs clean, this is paramount.
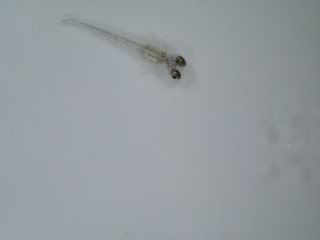
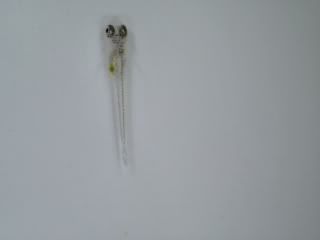
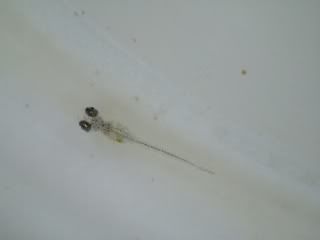
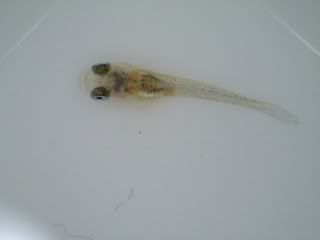
Images of day old Nothobranchius rachovii Beira98 fry by the Author.
So for now at least everything is going to plan, next step will be to increase the feeding regime and introduce microworm followed shortly after by newly hatched brine-shrimp. When I say newly hatched I mean exactly that, as Artemia nauplii can double in size after 24 hours and loose quite a lot of nutritional value in the process which is negative of what we want.
On we go!
-----------------------------------------------------------------------------------------------------------------------------------------------------------------------------------------------------------------------------------------------------------------------------------------------
The Rachovii fry are now approx one week old.
They are feeding on Brineshrimp nauplii/Microworm 3 times per day with no problems. 50% waterchanges are being performed daily with the same chemical make up as they were hatched in.
I have lost one straggler in this process, there are, as always a couple more who are not keeping up with the pace so I will allow them a couple more weeks before the cull. Heartless I know but there's no point to keeping sub-standard fish. IMO
Today I redried the peat in the hope for a second hatch.
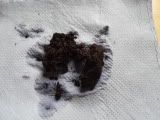
First the peat was strained through a fine mesh net then placed on some absorbent tissue and allowed to dry out somewhat to the consistancy of rolling tobacco. Finally the peat is bagged and sealed with a little air. After labeling, the packet is then stored in an dark warm place for a further 2 weeks, whereby the peat will be re-wet.
This is normal proceedure when dealing with any annual Killi eggs, and one would expect to get some more fry from the second hatch, possibly even surpassing the first. As these eggs were originally from the Far East the liklihood of obtaining a good second hatch must be questionable, but we'll wait and see.
---------------------------------------------------------------------------------------------------------------------------------------------------------------------------------------------------------------------------------------------------------------------------------------------------
It's been a while since I updated this thread/journal so let me put that to rights now with notes I'd written down since the last instalment.
21/11/2010
The fish are now growing at pace and I will soon have to introduce a pot of peat into their aquarium (in the next week or so) to provide them with somewhere to deposit their eggs. Of the four males, one is a cracking fish, very well marked and good body shape. This will be my main brood male for subsequent generations. I have developed a love for this little species once again and may decide to keep and breed these long term. They are a little finicky to hatch and feed the fry but it's well worth the effort when you see the resulting males.
Pics to follow....
24/11/2010
Re-wetting the peat after a few weeks yielded only 5 more fry. Not a great result but it was performed just to show that it is possible to have more resting eggs within the peat mass which have not finished their diapause stages. It is now time to set the original batch up with a view to breeding. There is no time to waste, annual killifish mature quickly and will soon be ready to breed.
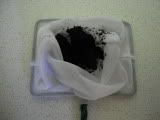
The substrata that I like to use for breeding annual killifish species is peat, in pelleted form. You can purchase these from your local garden centre.


I like to use plastic receptacles such as the image above. I place one pellet into the pot and add some tank water , the pellet will now swell and become waterlogged. It is now ready to be slowly added to the tank.
The males are now forming a hierarchy and the dominant male is trying to spawn with the females so we now need to add some medium for them to deposit their eggs into.
Nothobranchius rachovii are what we term as peat ploughers rather than actual divers such as some of their South American counterparts. The male will drive the female into the peat medium from above and behind, he will wrap his dorsal and anal fins around the female and shimmer until you will notice a slight "jerk" motion at this point a single egg will have been deposited just below the surface of the peat and fertilised by the pressing male. The female will then be released. The male will either perform the same act with the same female again or he will chose another. Either way this will become a continuous cycle of events from now until the fish expire.
05/12/2010
As time passes in their short lifespan...
The females dont seem to be getting the breeding container idea, I think it's the steep sides, alas the male lays in wait forlornly within the pot.


I may have to resort to a shallow sided lunch-box type of spawning receptacle. The transparent pint pot idea was to present me with the ability to let folks see (via an embedded video) the typical Notho spawning behaviour. Although this may still be possible, we'll wait and see what transpires when I install the new box.


Interestingly enough this species will eat frozen mini Bloodworm & Tubifex something which I have trouble with getting Nothos to consume in the past. So thats a plus.
To be continued...
-----------------------------------------------------------------------------------------------------------------------------------------------------------------------------------------------------------------------------------------------------------------------------------------------------
Live Foods in the Tropical Aquarium
- Details
- Parent Category: Articles
- Hits: 7354
Aquarium Club of Lancaster County, Pennsylvania
Courtesy of Paul Bricknell, President
Vinegar Eels
In 1 Gallon Jar:
Use 1/3rd vinegar 2/3rd water
About a 2” cube of apple
One teaspoon of sugar
Then add starter culture
To collect the worms:
Use a long necked bottle, Fill to the base of neck with the culture. Place plug of filter floss at base of neck and just into the culture medium. Fill the neck of the bottle with tap water. The worms migrate through the filter floss into the plain water and can then be pipetted into fry tanks.
Culturing Paramecium
This is a technique I learned from Dan Helwig. It has proved to be simple and effective:
Initially I used clean, glass, one quart mason jars. These were filled with the hottest water from the tap. This ensures there are no other micro organisms present which might destroy the paramecium culture. Immediately add six split peas. After about 5 to 6 days the water in the jar becomes cloudy due to a bacterial bloom. Now add the paramecium starter culture. After a few more days the solution will clear and you will see clouds of paramecium present.
I usually sub-culture every 3 to 4 weeks or when I see the culture declining. Even if you can see no paramecium, just add fresh bacterial suspension or add a few split peas and the culture will come back. Subsequently, I have been using full, square 1.5 litre glass jars. Use about 12 split peas with these.
Using this method I have maintained a paramecium culture for several years.
Grindal Worms (Dwarf White Worms)
The ideal temperature range for culturing Grindal worms is 70 F to 80 F (75 F is ideal). Do not worry if your culture contains few large Grindal worms, the small worms will grow and reach a large size in the new medium within a few days.
A plastic shoe box or any small container can be used to culture the worms. The container should be covered to keep moisture. If the cover is completely air tight, it should have some small holes punched in it with a tiny nail. If the container is transparent, place the culture in a dimly lit area.
Soil medium made of peat moss and potting soil (without fertilizers or chemicals added) can be used to culture the worms. However, the best medium is Canadian sphagnum peat moss. Use half a cup of agricultural lime (natural crushed lime stone-brown in colour) per 2 gallons “volume” of peat moss. Mix the soil with water to the point that a tightly squeezed fistful of soil medium yields a few drops of water. Cover the bottom of the container with two inches of the soil medium. Keep the surface of the soil moist at all times. Place the starter culture on the surface of the soil and dust with a pinch of crushed fish flakes. Using a very fine spray (a house plant mister works fine), lightly moisten the starter culture and food powder. Each day, gradually expand the area on which you sprinkle the food as it is consumed by the worms.
After a few days, nearly the whole surface of the medium should be covered with worms. If not, check the temperature. If the temperature is less than 70F the worms may stay dormant or multiply slowly and most of the food will decay before the worms have a chance to consume it.
Grindal worms thrive in warm temperature and multiply quickly. Therefore, you should keep this in mind during winter months.
The easiest way to harvest the culture is to place a thin 2 to 4 square inches of plastic sheet or glass on the surface of the medium and sprinkle it with crushed fish flakes. After a few days or so, the worms should cover the sheet searching for food. Take the sheet carefully and submerge it in a cup of water. The worms will aromatically leave the sheet into the water. By using an eye dropper or a pipette, you can feed the fishes little by little. Keep in mind that the worms can not live in the water for more than a few hours.
Feed the worms high quality, high protein dies. White bread soaked in skimmed milk is not an ideal food for Grindal or White worms. The quality of the worms depends on the food they consume. You can condition any fish for breeding if you feed it quality Grindal worms. The proper amounts of moisture and food are best found by trial and error. The culture can be somewhat touchy about both of these things, but close attention to them for the first couple of week should suffice.
White Worms (Enchytraeus)
As soon as you receive your starter culture, set up a large culture without delay. The ideal temperature range is 60F to 70F. If you cannot keep your cultures cool, try to use a refrigerator.
A plastic shoe box (one gallon ice-cream containers are ideal) can be used to culture white worms. The container should be covered to keep moisture. Small holes should be punched in the cover for air exchange. Soil medium made of peat moss and potting soil (without artificial fertilizers or chemicals added) can be used. Mix the soil/peat with water and a small amount of agricultural lime (one cup is enough for each cubic foot of soil) to the point that a tightly squeezed fistful of soil medium yields a few drops of water.
Warning: Use only the natural crushed lime stone (brown in colour) agricultural lime. Using any other lime (usually white in colour) regardless of the brand will destroy the skin of the worms and kill them. The natural agricultural lime is mild and increases the pH of the soil slowly.
Cover the bottom of the container with 3-4 inches of soil. Place the starter culture in one corner of the medium. Mix a teaspoon of baby cereal or raw oatmeal with half a teaspoon of skim dry milk. Add some water to the mixture and make a semi hard dough and place it near the worms. Cover the food and the worms with 1 to 2 inches of soil. Add more food when the food is consumed. A variety of food can be used such as uncooked oatmeal, white bread soaked in skimmed milk, dry milk etc. A mixture of crushed oatmeal, dry skimmed milk and baby cereal is ideal. Baby cereal should provide the essential vitamins.
Keep the culture in a cool dim place. High temperatures may kill the worms. When the worms are abundant and the harvest time comes, place the container over a warm (not hot!) surface for a couple of hours. If everything is okay, the worms will see the coldest spot in the culture. Usually creating small balls on the top of the soil or they may even crawl up the container walls.
Some aquarists who raise large quantities of white worms rig an apparatus whereby the heat from a light bulb forces the worms to crawl down through the soil to drop through a wire screen into a waiting container of water. The worms will live for 24 hours or more under water if is well oxygenated and not too warm.
Red Worms
When your starter culture arrives set up a large culture as soon as possible. Keep them cool at temperatures less the 80 F if possible. For best results, culture your Red worms in a large container such as a large washtub or large cooler. Try to culture outdoors if possible.
Fill ½ full with damp peat moss or a mixture of damp peat moss and potting soil (no fertilizers or chemicals) Add half a cup of natural agricultural lime (use only the natural brown lime) for each square foot of culture surface and mix well. Agricultural lime will help in stabilizing the pH of the soil. You may need to add more lime every three months to maintain a suitable pH. Check the pH of the soil before you add any lime. The culture medium should be damp (but not wet). Do not cover the culture but if you do, make sure to drill large holes in the lid to allow for some air exchange.
For best results mix equal portions of uncooked frozen peas and carrots and uncooked “old fashioned” oatmeal and scatter over the bed. Wet feed until moist throughout. Red worms cannot feed until it is moist.
Cover the feed with one to two inches of soil. Chicken laying mesh can be used instead. Cottonseed meal and ground corncobs (shuck and all) are all good feeds. Avoid feeding your worms any kind of meat or high protein feeds. Do not add new food until all old feed has been consumed. Wait at least two to three months before harvest. To reduce this time start with one pound culture or buy at least six small cultures. Investigate!
From here, they may be fed either whole or chopped. Always rinse your worms off before feeding them to your fish. The worms may live in well aerated water for more than 48 hours. In one of my aquariums Red worms lived under water for more then two weeks! This treatment should clean the digestive system of the worms. As with any new food, it will take some time for your fish to adjust to accepting the worms as a source of food. Once your fish realise that the worms are food they will readily accept them.
Fresh Water Rotifers (Philodina)
As soon as you receive your culture set up a large culture as soon as possible. The temperature should be from 65 F to 90 F. One gallon or a half gallon jar is ideal for culturing rotifers. The cultivation of rotifers is quite simple. Please use hard water if possible. Place a small piece of a hard boiled egg yolk (the size of a pea) in a gallon on unpolluted spring water and allow it to remain uncovered overnight. This is then inoculated with the starter culture of rotifers. If you use the ciliates food or daphnia food, use about 1/8 teaspoon (a pinch) per gallon of water. Few grains of boiled wheat or rice can also be used to culture the rotifers. After one week, rotifers will be abundant for harvest. Rotifers usually attach themselves to the walls of the jar. A 30X pocket microscope can be used to identify the species of rotifers in the culture. Try to maintain more then one culture and do not over feed.
You can culture rotifers directly in the breeding tank but be careful not to contaminate the water by overfeeding. To do this, inoculate the breeding tank before or during spawning with one large culture of rotifers. Add a small amount of infusoria food (about 1/8 teaspoon per 10 gallons of water) every two days or you can use a small piece of hard boiled egg yolk instead of infusoria food. After a few days the rotifers will be abundant and ready for hungry fry. As long as the water is cloudy, you should not add any food to the breeding tank.
To maintain a healthy culture for a long period of time, make a 50% water change every week. If the water is clear, feed the culture a pinch of food whenever you make a water change.
A collection of personal fishkeeping (and allied) memories
- Details
- Written by John
- Parent Category: Articles
- Hits: 7040
A collection of personal fishkeeping (and allied) memories
PART 1
Read more: A collection of personal fishkeeping (and allied) memories
The Peacock gudgeon (Tateurndina ocellicauda)
- Details
- Written by Platty252
- Parent Category: Articles
- Hits: 10447
The Peacock gudgeon (Tateurndina ocellicauda)
by Platty252
This is a beautiful little gudgeon from Papua new guinea where it inhabits ponds, rivers and forest streams.
In its natural habitat it can be found schooling. Something i have never seen them do in an aquarium.
The colour of this fish could rival many killifish. It has a base colour of pale blue with broken red vertical stripes. On the peduncle you will find a large black eye spot. This is the first thing to colour up on young fish. The fins have some bright yellow and some times a black trim on the anal fin. The caudal fin is also edged in yellow and speckled with red.
Mature males are larger than females and will have a more bulbous head or moderate nuchal hump. This is the best way to sex them and once recognized can be seen from a very young age. Sexing by colour difference is not always accurate.
The first time i seen these little beauties in a book i couldn't wait to get some. The only info i had was the basics. Temp. 22-26c (72-79f). Max size 7.5cm (3"). PH 7.
Unfortunately it was more than a year before i could obtain a small pair no more than 3cm in length.
First attempt to keep this fish.
I placed these in a 60l tank that had plenty of plants, an air driven sponge filter, dark substrate and low light.
The temp. was set at 24c (76f) and pH around neutral.
The day after they were placed into the tank they couldn't be found. There was no sign of any remains in the tank so i figured they were just hiding amongst the plants.
After 4-5 days i came to terms that they were gone. I proceeded to do a water change and clean the filter. When i went to squeeze the sponge i noticed it was hard inside. I knew straight away that's were they were hiding.
I cut open the sponge to find two squashed fish inside. I was absolutely gutted (so were the fish). I went back to the shop were i purchased them and they had none left.
I later learned they like to squeeze in to tight places to breed and this is probably why they were in the sponge. I recon they swam in but couldn't get out again.
Second attempt & first time to try breed this fish.
It was a couple of months before i managed to get some more. I picked out one male and three females. With a little more knowledge of this fish i decided i was going to try breed them. This was one of the first fish i bred so it was going to be trial and error.
I chose a different tank this time. Bare bottom, sponge filter with a cable tie at the bottom to prevent my previous mistake. Again the pH was neutral and the temp. set at 24c (76f). I added some plastic plants, some mopani wood and a hang on breeding net was put in place from the start. This was to keep any young i got in the same tank as the parents. That's if i ever got that far.
I fed them on brine shrimp, grindle and white worms. They dont take to commercially prepared foods very well.
It wasn't long before i noticed the male chasing two of the females away from one end of the tank and the third female by his side. The pair would shimmy beside each other and then break away from each other. But there was no sign of any egg been laid.
The next day the male had done a disappearing act. The two females he had been chasing were still up in one corner of the tank and the other female now looked thinner and less colourful.
The following day my patience got the better of me and i went looking for the male. I found him tucked in to a crevice of the mopani wood. He had been there with a bunch of about 30 eggs. Unfortunately my interference panicked him and he ate the eggs.
Second attempt to try breed this fish.
Not put off by my previous mistakes i carried on feeding them live foods and it was only a day or two before the male selected another female.
The pair moved in to the tight space between the glass and the hang on net breding trap. This is were they seemed to violently shimmy and vibrate against each other.
At last some eggs. Once the eggs were laid and fertilized by the male he chased the female away. He returned to the eggs, lay in the middle of them and start fanning to keep the water circulated around them.
He kept this up all the time except to chase the odd female that might come to close or to snatch some brine shrimp that might come close enough.
I couldn't have wished for a better place for the eggs to be laid. Slap bang in the middle of the front glass perfect for my viewing pleasure.
By day two you could see the eggs develop and by day four you could see the fry wriggling around inside. On the sixth day they started to hatch. It was early in the morning before i was going to work so i left them.
When i returned from work i found the male sitting in the same spot with a fresh batch of eggs and verry few fry in the tank. The fish in the tank had a feast on them once they were free swimming.
The few i managed to collect were floating around the surface of the water and were hard to catch. These were placed in the net breeding trap.
The breeding trap ended up a bad idea. The male would get ragged fins from fanning the eggs and rubbing off the net. The fry would get trapped in between the net and the plastic structure that kept it in place.
Raising the young.
The young were fed on liquifry and microworms for the first week and then brine shrimp. After a month they were moved to a tank to grow on which took a long time. It was three months before they showed any colour and six months before they could be moved on or sold.
Once the appropriate size food was offered and the water was kept clean there was no real problem raising them and very little losses after the first week.
Future plans.
I recently got hold of a young pair of these which i will breed again. This time i will make some changes to the tank set up.
I will use a 20-30L tank. Bare bottom with a sponge filter as above. The water will have a pH of around 7, temp. 24c, low light and i will use two pieces of 3/4" PVC tubing about 3" long. This will be the only decor in the tank and should be used by the male as spawning caves. Both ends will be left open. Once the a cave is selected by the male and breeding has taken place i will leave them for 4-5 days. After that i will remove the tube and eggs without the male to an acrylic breeding trap. An airstone will be placed close to one end of the tube to ensure oxygen rich water flows over the eggs.
While the male has been looking after the eggs i will be feeding the female heavily trying to get her in to breeding condition again. Once the first lot of eggs have been removed i hope the pair will breed soon after so i can raise two lots together.
Once they breed the second time the female will be removed and 4-5 days later then the male will be removed. The second lot of eggs will be left in the breeding tank to hatch and after a month or so i will release the first lot in to the tank and raise the lot together. As they grow they will be moved to a larger tank to grow out.
© www.irishfishkeepers.com - October 2008
A collection of personal fishkeeping (and allied) memories Part 2
- Details
- Written by John
- Parent Category: Articles
- Hits: 6963
A collection of personal fishkeeping (and allied) memories
(Pt II)
After leaving school and starting work the extra funds soon started off my fishkeeping motivation again, I, coincidentally, worked in a manufacturing jeweller’s just off Hatton Garden – a stone’s throw from Gamages… yes, it was still there with a better assortment of fish too (and a dreadful Parrot which would swear at customers and wolf-whistle to all the ladies, although in truth it probably did that to all customers).
Read more: A collection of personal fishkeeping (and allied) memories Part 2
Page 3 of 5