
The Basics of Fish Keeping
What do I do with my Carnival Goldfish?
- Details
- Written by Thomas Franklin
- Parent Category: Articles
- Hits: 5058
Goldfish are a very common freshwater fish species but they're are not quite as straightforward as it may seem. Below we’ll touch in some common myths about goldfish and rumors associated with the colorful graceful species.
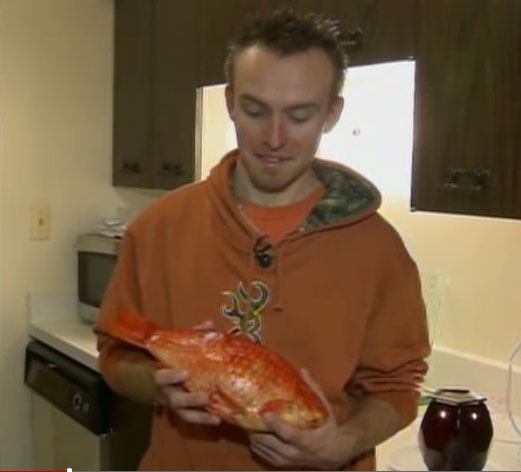
Why do goldfish have a reputation of being easy to care for? Probably because of their availability, you can win them at carnivals. Although some animal activists have been trying to get goldfish prizes banned (it's a controversial topic, due to lack of proper care most of these goldfish die anyway) there are many carnivals that still give winners a bag with goldfish when they throw a ring over a bottle or throw a ball in a hoop.
If you happen to be one of these winners, chances are you're going to check your home for a bowl, or maybe a big cookie jar. Congratulations on your win but before you do anything, maybe read through goldfish care on Fish4Beginners.com it's fast point form list on how to keep fish alive.
Here comes the second myth about goldfish, they can't live in bowls! It's so confusing however because even I've seen in a pet store aisle for sale “goldfish bowls” it's simply part of the reputation of goldfish but in reality, they are very messy and cannot tolerate living in cramped conditions. Looking into the origins of this fishy rumor, perhaps it's due to the fact that goldfish get their oxygen from the surface not within the water like most other topical fish species. Knowing this piece of information, a bowl seems to be the perfect habitat, no?
If you have a massive bowl it may work with filtration but the average cookie jar will not be successful. Consider the mass of a goldfish, they are wide bodied therefore taking up twice the space of a similar sized tetra, for example. Knowing this they would produce twice the poop. A filter is now needed. Not just any filter, but a powerful one that can circulate the water and pick up the detritus as it floats by.
They can grow quite large, it's partially true that a fish is only going to grow to the proportions allowed by it's environment, but keeping it in a small space is going to stunt growth and cause a whole hearth of health problems. A 29 gallon may be the minimal size, personally, I would never place a goldfish in a smaller tank and highly suggest you do the same.
Children enjoy keeping goldfish alive – or attempting to anyway, at least most look the same so when one dies it's easy for a parent to take a quick trip to the pet store while the child's at school to purchase a similar looking fish and voila! Mr. Bubbly is still thriving and alive! Comically, recall the episode of full house when Michelle won a goldfish from a carnival and the occurrences to follow, for a trip back to memory lane you can view the episode here: http://www.tv.com/shows/full-house/a-fish-called-martin-47415/
Setting up your 1st Tropical Fish Tank - a guide
- Details
- Written by Darren Dalton
- Parent Category: Articles
- Hits: 24832
Setting up your first Tropical Fish Tank
So, you’ve decided to buy an aquarium and have a nice tank of interesting Tropical Fish?
Sadly the process of getting it home, filling it with water and stocking it immediately with fish just cannot be done.
We’ll try to explain to you why, but very basically water which comes from our taps is unsuitable for Fish without further treatment.
The first thing to consider is that water companies treat water with Chlorine which is toxic to fish, so you have to neutralise that, this is easily done by adding a prescribed amount of any of the commercially-available Water Treatments usually called Water Conditioner, especially made to do this job.
Next thing to bear in mind, and a really important one, is that you should not use water from your hot water tank as the tank is made from copper, and copper – along with other ‘heavy metals’ can be lethal to aquatic life.
You may say that your drinking (cold water) tap is supplied with water which passes through copper pipes but much less is leached into the water from the shorter length of copper, what little gets in is dealt with by the previously-mentioned Water Treatment another thing is the cold water will collect less contaminants than the water which is heated in the hot water tank.
You will need to decide where to set your aquarium - preferably away from draughts and also in an area which does not receive too much direct sunlight.
Next you need to choose a substrate for the base of the tank, it can be gravel or sand, and top it up with treated water – now for the fish? The answer is still most definitely “NO”.
Go back two steps – your substrate has to be thoroughly washed - and washed again. For gravel use a fine-meshed colander set over a bucket and quarter-fill the colander with your gravel.
Over this run water through a hosepipe at high enough pressure to make the gravel ‘tumble’ but not so much that it ‘tumbles’ out of the colander.
The water running through and into the bucket is constantly thrown away and this activity should continue until the water runs clear.Put this in the tank and then wash the next lot - until you've washed the whole amount. This is one of the more tedious tasks in setting up your tank, but the work put in now will be worth it in the long run - honestly.
This method can be equally well used to wash sand too, but without the colander as the sand would be washed through its holes.
Do this outdoors, gravel and sand have a nasty habit of getting washed over the sides of the bucket and if enough reaches the U-bend under the sink it will block it.
So now, you have your substrate washed and put in place…what next? It’s time to position the heater and filter,
as well hidden as is possible and place the thermometer in a spot where you can monitor it.
Now is the time to put in any rocks or wood (previously washed), do this carefully and achieve the sort of image you are planning to create, it’s much easier to do this before you put the water in than when the tank is filled up.
Finally it is time to top up with water.
The best way to do this with as little disturbance to your very careful landscaping is to put a saucer on the gravel and put a tall mug onto that, sitting centrally.
Treated water is then poured into the mug gently and this then trickles into the saucer, tumbles over the sides and onto the substrate causing little or no disturbance.
When your tank is about half-full it’s time for the plants (if you’re going to use them).
The choice of available plants is huge and you would be well advised to start with some of the easier-grown species, your local Fish shop will be able to advise you more fully than this small guide can, so ask away, they are there to help you. Once you’re happy with the set-up, resume filling with water. Once it’s filled - time to switch on the heater, filter and light.
Have a drink and sit back to enjoy your handiwork.
Now comes the waiting time… although there are several products available which can reduce, or even cut out, the need to make water suitable for Fish to survive (commonly known as ‘cycling’ – more of which in a moment), you can take the natural route if you prefer and if you have the patience - a very important attribute for fish keepers.
‘Cycling’ the tank, this is quite technically based but in ordinary terms it can be summed up like this: water in a fish tank goes through several changes before it is fully suited to aquatic life.
At first it is fine but almost immediately due to aquatic activity Ammonia starts to build up within the water, Ammonia is lethal to all Fish life so this must be got rid of.
Within your filter two types of bacteria will grow and live, very basically one lot will get to work on the Ammonia and convert it to Nitrite, which in itself is equally poisonous to fish, but then the second lot of bacteria starts to get to work, changing Nitrite to Nitrate which, although still not good, is less harmful to your Fish and can be kept in check with regular water-changes, which we'll talk about later.
Plants will also help to absorb Nitrates.
So, once this ‘Cycling’ process is complete your tank is almost ready to accept some of its fish, but here we must step back and explain the Cycling a little more, the Ammonia starts to build up as a result of Fishes’ excretion which starts to rot down in the water.
So we have to kick-start this by one of two simple methods (there are other ways which involve using household Ammonia but are not recommended for newcomers as it can be very dangerous stuff).
Route one is to do it with a ‘Fishless’ method which involves daily addition of a small amount of Fish Food which will gradually break down, causing an Ammonia build-up.
The other way is to use a couple (or more, but this really depends upon the amount of water volume) of what are known to be ‘hardier’ Fish.
These are lightly fed and their ‘waste’ will have the same effect as the food in the method we mentioned before.
The preferred method is as fishless cycle so that no fish are stressed in the cycling process.
To monitor the progress of the tank during cycling Ammonia, Nitrite and Nitrate need to be measured; all can be tested by using a Water Testing Kit, an essential purchase before you buy any fish.
Firstly you test for Ammonia which will start to rise quite quickly in the first few days of the cycle and then level off and then begin to drop.
This will be the time to start testing for Nitrites which will rise as the first type of bacteria in the filter gets to work.
Over time the Nitrites too will rise, then even out as the second sort of filter bacteria start doing their job turning the Nitrites into Nitrates, now’s the time to start deciding which Fish you would like to start stocking your Aquarium with…but only decide, still don’t get rash and buy anything as you have to get the Nitrates lower still and become stable – but you are on the last leg now.
As mentioned earlier Nitrates are partially dealt with by the plants but you still need to reduce them further by removing 15-20% of tank water once a week, replacing it with the equivalent of fresh water, treated with Water Conditioner and warmed to near the tank temperature with some heated water (use the water from a boiled kettle to bring the new stuff up to near the tank's water temperature).
There are other things to be thinking about – but that, more or less, is a simplified explanation of what you will need to do before you can start adding your Fish to the Tank.
Your stocking levels must be built up gradually over a period of weeks as more fish equals more waste and the bacteria levels will only grow to the amounts of feed (fish waste) available to them, but as we have seen already, they need time to build up their numbers, if too much Ammonia suddenly builds up it creates an overload which cannot be dealt with and creates what is known as an ‘Ammonia Spike’…the whole process crashes and has to start over again, which defeats the object of the ‘Cycling’ in the first place, not to mention the possible and likely disastrous effect it will have on your Fish.
So, easy does it.
A couple of afterthoughts, your filter must be on twenty-four hours a day, but they are very economical on electricity and quiet.
Your heater will be fitted with a thermostat which only operates the heating element until the water reaches a pre-set temperature.
For a normal community tank the temperature should be set to 75F.
It is best to keep your aquarium light on for ten to twelve hours a day, you will need to experiment, too much light will lead to the build-up of too much algae.
It is very important that one person within the family is given the job of being the ‘Fish-Feeder’ (although this job an be taken in turns, but only one at a time) and it is made clear to the rest of the family that no more food can be given, too often others will be tempted to sprinkle in ‘just a little’ and although the fish will probably eat this too there is a limit to how much they can actually digest and gain benefit from and excess food or fish waste will put the filter under pressure to deal with the excess waste and can lead to an "Ammonia Spike" as mentioned before.
Different foods from different makers have different advice on how much is to be fed daily, follow the advice given.
Always remember that the people in your local Fish Shop are there to help and advise you, don’t hesitate to ask them any questions and join the Irish Tropical Fish Society’s internet Forum: www.irishfishkeepers.com.
There are lots of experienced Fish-Keepers there who will be able to answer any questions you have.
The Forum is free and anyone can join and read the articles,join in and ask questions, but if you're reading this, you will have already discovered the Forum, so join up and join in.
You can also join the Irish Tropical Fish Society which meets once a month upstairs in Rosie O'Grady's in Harold's Cross at 8:30pm - the second Tuesday of every month.
Club membership includes a membership card which entitles you to discounts in many, if not all, aquatic shops.
We look forward to meeting you online or at a meeting in Harold's Cross.
The I.T.F.S. is a voluntary, non-profit society run by hobbyists for hobbyists.
My Tank
- Details
- Written by Darren Dalton
- Parent Category: Articles
- Hits: 9134
My Tank
From beginner to now
I got into fish keeping in about January 2007. I started with a jewel setup (jewel 80) which I got cheap as the light was not working and I was told that I would have to buy a new top to get light into my new aquarium. Little did they know a sharp knife, trip to the local elect rician’s suppliers and ‘voila,’ one fixed light at the great cost of 8 euro and a dribble of super-glue.
I did the usual thing that I think most people do with an aquarium; coloured stones; plastic plants; stick on plastic background, and once it was up and running overfeeding and overstocking. Once I realised that with the internet there was too much information available if you looked everywhere I decided to just keep to two forums and get the information I needed there, reading and researching what I didn’t know. The overstocking problem was easily overcome.... I’d buy another tank the same size. ‘Yer right’ said the wife once it was home! But I needed to divide those fish especially as the Corys then started breeding. I will admit the front room didn’t look right with 2 tanks in so it was back to the drawing board. My local fish shop had opened 3 months after I started keeping fish so I went to see what they had.
So Your Setting Up Your First Aquarium
- Details
- Written by sheag35
- Parent Category: Articles
- Hits: 7094
So Your Setting Up Your First Aquarium
Ok as promised a while back I’ll do an article on setting up a tank for beginners, so here it goes i will admit i have gotten some of the more technical info from other sites but majority of this is me.
When setting up a tank for the first time I feel it is necessary to put in a little background work first, by this i mean what fish are you going to keep, what is their natural environment like, is it a general community tank or something more specific e.g.: Malawi / Tanganyika, Amazonian etc. this WILL have an impact on your substrate, and decor to provide a long term happy environment for you fish.
Let’s start with tank size, personally I always advise going for the biggest tank you can afford, the more water volume the more stable your aquarium parameters will be, this is very important with regards to ph, nitrate, nitrite and ammonia, these at a wrong level WILL MOST DEFINATELY CAUSE FISH LOSSES. One thing i strongly recommend is you invest in a master test kit to help you monitor you water levels as your tank matures allowing you to know when it’s safe to add fish.
Ok let’s say you have bought your aquarium, it now home and you’re dying to get it up and running there’s a few things to consider first. Where are you going to situate the aquarium, keep it out of direct sunlight unless you enjoy cleaning algae off the glass every couple of days, keep it out of draughts as temperature fluctuations can have an adverse affect on fish health, and try to have it in a quiet spot in the room as kids running madly about or heavy traffic can stress some fish.
Now you’ve found that ideal spot what are you putting the aquarium on, is it a piece of furniture or did you acquire an aquarium stand with your purchase. If you are putting it on a piece of existing furniture remember 1 litre of water weighs approx 1kg so this will need to be strong enough to take the weight, if you purchased an aquarium stand all the better as it was designed to take the weight of your specific tank. Needless to say the stand needs to be level and on a surface that can support the weight of the tank, stand and water, also the surface the aquarium is put on needs to be smooth and have no rough edges that may weaken the base of the tank and cause leaks, i personally use polystyrene or rubber mats under my tanks to allow for this and so far no leaks.
Now for the fun part setting up the tank.
Firstly choose your substrate, in my rift valley tanks i use coral sand of different grades, for Amazon setups i use generic aquarium sand / play sand over a plant medium or even over peat depending on the ph I’m looking to achieve. Make sure to rinse, rinse, and rinse again the gravel / sand before you add it to your tank do it until the substrate runs 100% clear then add carefully to your tank. If you are using rock work now is the time to place it in the aquarium i use slim Styrofoam tiles under the rocks to prevent pressure fractures on the glass and then brush my substrate around it this also prevents fish under mining the rocks which can lead to rockwork collapses causing broken aquariums, if your building rockwork high in the tank please for safety’s sake either use and aquarium epoxy or silicon to keep them together, this will prevent collapses in the future.
Once your substrate is in you can now add water,
i generally pour mine in over a plate to stop substrate being blown over the aquarium fill the tank ¼ full and if you are adding live plants do it now, its easier than doing it in a full tank, plus the time waiting for your tank to mature will allow the plants to root themselves properly and thus thrive in your tank.
Once you have your decor in add your heater and filter to the set up, do not turn them on yet, now fill up your tank to its full level. 
For safety wait about 15 minutes before turning on any equipment especially the heater as it may crack if the water is too cold, this is why this 15 minute waiting period is what i suggest it allows the heater to acclimatise to the water temperature. Now that we’re all set turn on your heater and filter, add your water conditioners to take out harmful heavy metals and chlorine etc from the water i myself swear by easylife to do this job but you may prefer to use a different product, it may take a few hours to get the tank up to the desired temp. Do not under any circumstances add fish yet you have to cycle your tank, there is a little cheat here i use regularly which is to always run a spare filter in one of my established tanks which allows me to introduce mature media to the tank after the desired temperature is reached, if you cannot do this cycling the tank is slow but essential if your fish are to survive and be happy.
Cycling the Aquarium, here i will borrow information which will better explain it than i can taken from fishlore.com.
Some call it the biological cycle, the nitrification process, new tank syndrome or even the start-up cycle. They all are referring to the same cycle - The Nitrogen Cycle. This very important cycle is the establishment of beneficial bacteria in the aquarium and in the filter media that will help in the conversion of ammonia to nitrite and then the conversion of nitrite to nitrates. Check out the aquarium water chemistry page (on the left) for more information on these terms.
This process can take from 2 weeks to 2 months or longer to complete. It is vital for anyone planning on keeping aquarium fish to understand this process. Learning about this process will help you to be successful in keeping fish and it should definitely improve your chances when keeping tropical fish. The best way to monitor the nitrogen cycle is to purchase an aquarium test kit that will test for ammonia, nitrites, nitrates and ph.
Test your aquarium water every other day and write down your readings. You will first see ammonia levels rising. A few weeks or so later you should see the nitrite levels rising and the ammonia levels dropping. Finally, after a few more weeks you should see the nitrate levels rising and the nitrite levels dropping. When you no longer detect ammonia or nitrites but you can detect nitrates you can assume that it is safe to add your tropical fish.

Nitrogen cycle stages
stage1
Ammonia is introduced into the aquarium via tropical fish waste and uneaten food. The tropical fish waste and excess food will break down into either ionized ammonium (NH4) or un-ionized ammonia (NH3). Ammonium is not harmful to tropical fish but ammonia is. Whether the material turns into ammonium or ammonia depends on the ph level of the water. If the ph is under 7, you will have ammonium. If the ph is 7 or higher you will have ammonia.
Stage2
Soon, bacteria called nitrosomonas will develop and they will oxidize the ammonia in the tank, essentially eliminating it. The byproduct of ammonia oxidation is Nitrites. So we no longer have ammonia in the tank, but we now have another toxin to deal with - Nitrites. Nitrites are just as toxic to tropical fish as ammonia. If you have a test kit, you should be able to see the nitrite levels rise around the end of the first or second week.
Stage3
Bacteria called nitrobacter will develop and they will convert the nitrites into nitrates. Nitrates are not as harmful to tropical fish as ammonia or nitrites, but nitrate is still harmful in large amounts. The quickest way to rid your aquarium of nitrates is to perform partial water changes. Once your tank is established you will need to monitor your tank water for high nitrate levels and perform partial water changes as necessary. There are other methods to control nitrates in aquariums besides water changes. For freshwater fish tanks, live aquarium plants will use up some of the nitrates. In tanks, rock and deep sand beds can have anaerobic areas where denitrifying bacteria can breakdown nitrates into harmless nitrogen gas that escapes through the water surface of the aquarium.
There are two ways to get the aquarium cycle started, either with fish or without fish.
Starting the Nirtogen cycle with fish
This is not the preferred way to get the nitrogen cycle started because the fish are being exposed to ammonia and nitrites during this process. Many fish cannot and will not make it through the cycling process. Often times the fish become stressed and fish disease starts to break out. I wonder what percentage of disease is caused by the cycling of new aquariums?
Certain species are hardier than others and seem to tolerate the start-up cycle better than others. the zebra danio is a very hardy fish that many use to get the nitrogen cycle started. Again, using fish to cycle is not a good idea and you may be throwing your money (on dead fish) out the window. There is a better way. Read on, young grasshopper.
Starting The Nitrogen Cycle Fishless
There are a few different ways to get this process started. To easily get an ammonia reading from your tank water try the Seachem Ammonia Alert. It sticks inside the tank and has a circle that changes color depending on the ammonia levels in the tank.
Option1:
Using Fish Food
Drop in a few flakes every 12 hours. As the food decomposes it will release ammonia. You will have to continue to "feed" the tank throughout the process to keep it going.
Option2:
Use a small piece of raw fish or a raw shrimp.Drop a 2 inch by 1 inch chunk of raw fish or a raw shrimp into the tank. As it decomposes it will release ammonia into the tank.
Option3:
Use 100% pure ammonia.
Using a dropper, add 5 drops of ammonia per 10 gallons of aquarium water. If you don't get an ammonia reading with your test kit, add some more drops until you start to see an ammonia reading. Keep track of how many drops you've used so you can repeat this process daily. Continue to dose the tank with ammonia until you start to get nitrite readings with your test kit. Once you can detect nitrites you should only add 3 drops of ammonia per 10 gallons of aquarium water, or if you added more drops originally to get an ammonia reading cut the amount of drops used in half. Continue this process daily until you get nitrate readings with your test kit. Do a 30% water change and your tank is ready.
Option 4:
Use gravel and/or filter media from an established and cycled tank
This is the best and fastest way to go. This will seed the tank with all of the necessary bacteria for the nitrogen cycle. "Feed" the tank daily with flake food until you are getting nitrate readings. Depending on how fast you were able to get the gravel and filter media into your tank, you may be getting nitrate readings in only a day or two. There are some drawbacks to this method. Ask your source if they have recently used any copper medications in the tank. If they have and you are planning to have invertebrates in the tank you should probably not use this method. Invertebrates will not tolerate copper. Get a copper test kit to determine if it's safe to use.
Option 5:
Use filter start - claims to colonize your water with the necessary bacteria needed to get the cycle going along with detoxifying ammonia so it doesn't harm the fish. To be used at the start of the tank setup and whenever you add new fish to your tank.
Another bacteria culture product is Tetra SafeStart . Once the cycle has started only add one or two fish at a time. Wait a couple of weeks before adding more fish. This will give your tank the time it needs to catch up with the increased bio-load.
Speeding Up the Cycling Process
There are things you can do to speed along the process of cycling your aquarium.
Increase the temperature of your aquarium water to 80°F-82°F (27°C-28°C)
Get some beneficial bacteria colonies. Borrow some gravel from an established and cycled aquarium. If you have another tank with an extra filter you can use it. If you have a really nice friend with an established and cycled aquarium, ask if you can have one of their used filter media. It will be loaded with the good bacteria that we are looking for.
There are products on the market that claim to introduce the beneficial bacteria. For more information, check out products like Tetra SafeStart in option 5 above. There are many more products entering the market that contain the beneficial bacteria necessary to seed your tank. Between live rock (for saltwater aquariums) and the bottled bacteria being readily available, there really is no excuse to make fish suffer through a cycle.
Now that thats explained when the cycle has completed you may now add fish, i would add no more than 6 at a time to allow your filter to increase its beneficial bacteria to the increase bio-load, after your levels balance again (usually a week or two) add another 6 fish and continue this process till you have a healthy level of fish in your tank. For stocking levels heres a link to a good article
http://www.thetropicaltank.co.uk/tanks-uk.htm
Acclimatising your fish,The most commmon tropical fish acclimation methods are:
The Floating Bag Method , The Bucket Method, The Drip Method
The Floating Bag Method
This is probably the most common acclimation method and it works well. You just need to be careful when floating a bag full of unknown water in your tank. Ideally, you're floating the bag in a previously setup quarantine tank but, sadly, many new hobbyists don't use a quarantine tank. After you've been in the hobby for awhile and experience any sort of fish disease outbreak you'll soon come to realize the importance of a simple quarantine tank.
After you leave the fish store you will want to go straight home to avoid ammonia accumulating in the bag (in the form of fish waste). Once you get home, open the top of the bag and remove about 25% of the water from the bag. Replace this water with the same amount of water from your tank. Float the bag in your tank and bring down the hood opening on the open end of the bag to help keep the bag secure. Every 10 minutes add about 1 measuring cup (use less if the bag is smaller) of your tank water to the bag. Repeat this process for about an hour. After an hour has passed use a small net to get the fish out of the bag and gently place the fish into your tank. The main idea here is to slowly get the fish used to your tank water (acclimated). Do not dump the bag water into your tank! If you do, you risk exposing your tank to any parasites or diseases that were in the dealer's tanks.
Some fish may be difficult to net while in the bag and you don't want to damage the fish while trying to net them. If you're having difficulty netting the fish, get a large bowl (large salad bowl works well) and carefully pour the bag water into the net, allowing the bowl to catch the water. You could bypass the bowl altogether and do it over a sink but make sure that the drain plug is in place just in case you miss the fish with the net.
By slowly adding small amounts of water from the tank we are slowly acclimating the fish.
The Bucket Method
This method is basically the same as the floating bag method, but instead of floating the bag in the tank you're putting the bag inside a clean bucket instead. The bucket method is better than the floating bag method because you don't have to worry about any of the bag water entering your tank.
Open the top of the bag and remove about 25% of the water from the bag. Replace this water with the same amount of water from your tank. Every 10 minutes add about 1 measuring cup of water to the bag. Repeat this process for about an hour. After an hour has passed use a small net to get the fish out of the bag and gently place the fish into your tank.
The Drip Method
The drip method is recommended for most sensitive fish and invertebrates because they can be more sensitive to pH, specific gravity and other water chemistry changes.
To do the drip method your going to need a bucket, a vegetable clip with a suction cup for holding the tube in the tank and a length of air pump tubing that is long enough to extend from your tank to the bucket. Place one end of the tube into the veggie clip and then place the veggie clip into your tank. Tie a knot in the tubing to regulate the amount of water flow coming out of your tank. Get the siphon going and place the other end of the tubing into the bag in the bucket. You'll want a slow drip, drip, drip going. Aim for drips every one to two seconds. If you're having troubles using the knot to regulate the drip rate, any type of strong clip should work. Vice-grips (locking pliers) or c-clamps would work as well.
How long you do the drip method depends on what your acclimating. If your doing this method for most freshwater species you should be ok doing it for an hour or so before introducing the fish to your tank. If you're doing this method on a saltwater invertebrate you may want to take 2 or 3 hours for this acclimation procedure. If you have a good pet shop and you trust their advice, ask for and follow their recommendations on the amount of time needed for acclimation.
Acclimating new fish to your aquarium is a critical step and should not be taken lightly. Getting into the habit of using proper acclimation methods is a good way to ensure your long-term success in this wonderful hobby!
Ok i hope this helps all newbies to fish keeping, and given a chance i will do another basic help guide soon
Thanks for reading;)
Seamus
Starting up & maintaining a stress free aquarium
- Details
- Written by Darren Dalton
- Parent Category: Articles
- Hits: 9712
Starting up & maintaining a stress free aquarium
So you’ve decided you would like to have an aquarium. Congratulations! You’ve chosen one of the worlds most popular and most rewarding hobbies. A well designed, well kept aquarium never ceases to amaze, intrigue and entertain people with its diverse range of occupants in constant motion and interacting with their environment.
Keeping an aquarium is sometimes the only choice for some people who live in small apartments where a dog or cat isn’t allowed. Or perhaps you have allergies which are easily set off by the presence of fur or feathers. If this applies to you then an aquarium is the ideal choice for you. Also, fish do not need to be sent to a kennel when you go away on holiday for a week.
But where do we start? How do we get from our initial idea to the finished masterpiece without getting things wrong (which is a very common mistake)? Well, from reading this article you have proved that you’re not just another one of those people who go to the shops and buy absolutely everything needed, including fish, arriving home and employing the ‘just add water’ technique which is prevalent in so many newcomers to the hobby. Though usually through no fault of their own. This is definitely the route to failure, not to mention extra expense through dying fish.