
The Art of Culturing Algae at Home
(Chlorella sp.)
by
Puddlefish
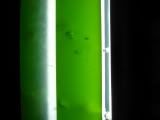
Early culturing of freshwater green algae was met with mixed success
Chlorella is a genus of single celled or clustered green algae found either in fresh or salt-water and in soil. The alga cell itself is spherical and possess a cup shaped chloroplast. Chlorella reproduces asexually and has been extensively used in the study of photosynthesis. It multiplies rapidly under the right conditions needing only Carbon dioxide, water, sunlight and a small amount of minerals to reproduce.

In times gone by the thought of culturing algae summoned up visions of various water filled containers strewn around our back gardens which relied on Mother Nature to do her best. Agreed that Mother Nature is a complex and wonderful thing but whilst our containers, over time, were amassing their green soup, they were also harbouring and being inhabited by all manner of living organisms, some of them good and some, some not so good.
Nowadays, scientists in their quest to replicate Mother Nature have developed the ability (in which it can be argued to “give her a helping hand”), to artificially produce, with the aid of some simple apparatus, the means to culture this green elixir indoors. This in turn means that we do not need to rely solely on the alfresco style to culture our algae. The following article takes us through some of the highs and lows encountered by myself as I tried to perfect the art of culturing algae in the home.
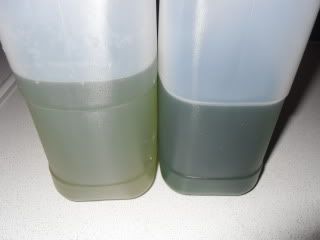
The sample on the left is algae which has been collected from an external source whilst the darker more dense sample on the right represents algae cultured indoors.
I may add at this point that I have no scientific background whatsoever; my personal findings are mealy as a result of trial and error and there may be something more to come out of this “scratching the surface” if you like, that more technically and chemically minded folk could enlighten us further.
Algae culturing for me personally started around about the year 2009. The need for such a facility was borne out of the necessity to feed my growing stocks of Copepods and the likes. It would initially form the basis of the food chain under which my killifish species could be fed some aquatic form of live foods which I could also culture in house. First I needed to acquire a true strain of Daphnia, without all the hangers on that we find if we collect this water flea from the wild. I managed to find a local breeder of such whom also sold initial algal starter solution for to grow your own elixir if you so wished.

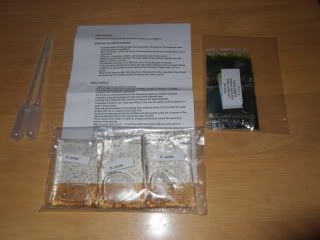
Algae and Daphnia starter kits.
He sold many forms of Daphnia from Daphnia magna (one of the larger species) right down to the smaller species such as as Bosmina longirostris. I chose the medium sized species Daphnia pulex for my first tentative foray into the world of Home Aquaculture. This species, when adult, is just the right size for medium sized killifish to consume.
The Daphnia, when they arrived, were set up as instructed and their culture vessels were inoculated with some liquid algae which also came with the kit. Time was now of the essence, I needed to get on with the job in hand, which was to get my own version of collecting algae set-up if I was going to keep my water-fleas alive and breeding.
The algae need a variety of things in-order to get it to grow and multiply. The main requisites are Light, Heat, movement (via air) and a food source. Arguably we could, and possibly should include CO2 infusion in the above list but for the purpose of this article as it stands at present, in today’s form, I have not delved into that side of culturing just yet, but I have the apparatus available at my disposal and hope to pursue this aspect further in the future.
The Early Days:
Receptacles;
My initial culturing vessels involved the use of 2 litre soda bottles which, after a period of time fouled up rather quickly and became opaque in colour, this meant that they would be starved of the light and this very important aspect in the process could not be utilised to its greatest potential. Cleaning these plastic bottles was a constant chore so I subsequently changed over to tall glass receptacles (spaghetti Jars). These were a lot better and had the added bonus of being easily cleaned. A word on cleanliness here if I may, To culture algae successfully (or as successfully as you can outside a lab) one needs to be meticulous in sterilising and cleaning the apparatus and utensils you use every time you set new rotational cultures up, otherwise you will be left with a weakened lighter culture and not the emerald to dark soup you are seeking to acquire.
Water Chemistry;
Water chemistry in the early days did not matter to me so much as it does today, I experimented somewhat with this aspect for a time and tried various types and permutations of Tap, Reverse Osmosis and Local Rainwater. All affecting the culturing process, I expect in different ways with differing results. I also suspect that anyone trying these methods I have employed in my quest to culturing algae will find that it may not work for them and they may subsequently need to changes things a little to get the results they seek. As has been mentioned earlier I hope to experiment with CO2 infusion at some point in the future, this may, quite possibly, affect the water chemistry a little so some re-adjustment may need to be performed at that stage to keep the algae production at the level prior to it’s inclusion.
Water Movement;
Water agitation, as in most cases within this hobby of ours is almost always provided via an air pump and in this scenario it is no different. Air-lines were rigged up to provide a very high rate of agitation to each of the vessels as the algae needs to be in constant suspension for it to thrive. The problem with my jars were that they were flat bottomed and although I could culture the algae pretty well some settlement did occur and this is far from ideal. This was one other negative aspect that I would need to address in the future.
Foods and Feeding;
Again with the initial starter kit the seller provided me with some kind of liquid food for my first batch of algae. It was blue in colouration and although liquid it had a thin oily type of consistency to it. It was never divulged the specific name of the product except to say you can use house plant fertilisers to feed the algae once your supplied sachet was expended. So my next pending task was to trawl the shelves of my local DIY Superstore (Houseplant section) to try and ascertain which product was closest to the food I was originally supplied with. I ended up with two products namely Miracle Grow and a home branded Orchid food. I purchased both and trialled them with my cultures. Both seemed to work pretty much fine but I was never achieving a dark liquid algal culture. These plant foods were also high in phosphates and certain chemicals that I knew would not be beneficial to my Daphnia cultures, so the quest went on. You’ll read late what I eventually came up with.
Illumination;
The cultures can be given a photoperiod of around 12-14 hours per day but initially I had no provision to do this so I maintain mine in a lighted cabinet with the lights on 24/7. The source of lighting may also be important so I reckoned that it would be best to go with a small daylight spectrum based bulb, this also had to be energy efficient and it operates at 18w 6500k. The cupboard is also home to (on various shelves) Micro-worm, Banana-worm, Grindal-worm, Vinegar Eel, Paramoecium & Drosphillia as well as containing various darkened pots of developing eggs.
Temperature;
Heat is also an important commodity that needs to be factored in when attempting to culture algae. There are probably many resources out there to be able to do this depending on the size of the cultures you wish to maintain but for me and the purpose of my scale of culturing the light source would also become my form of supplying heat to the vessels containing the algae. Back then I utilised a 500mm kitchen wall cupboard (internally) for the production of algae, this could be insulated by means of polystyrene ceiling tiles for heat retention. The ambient temp from the lighting would heat the cupboard to around 72’F which seemed to be fine for cultivation given the literature I had read.
Well that was the precursor of today’s cultivating setup; some aspects have been retained to a more or lesser degree and on certain things I’ve had to have a total rethink. As always, and as in life in general, pitfalls and losses still occur and it is this seemingly ongoing battle to rectify these mistakes and to minimise those pitfalls that keeps me going in my quest. Almost one year later from my first steps into this mysterious world I have managed, through reading and making the odd blunder to replicate to some extent a respectable source of algae on which to feed my Daphnia, Moina and Shrimp. Here follows the information of where this journey has led me to today......
The Present:
Receptacles;
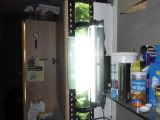
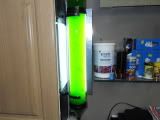
Whilst retaining my original cultures (although not ideal) I prefer keep these as a backup just in-case anything untoward should happen to the main culture. The vessel of choice nowadays is a long acrylic tube tapered at both ends, made by Aquamedic it is specifically marketed as a Phytoplankton reactor mainly for the marine aquarist.

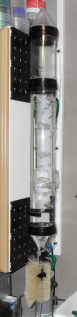
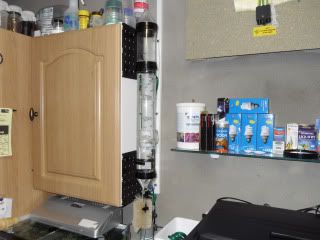
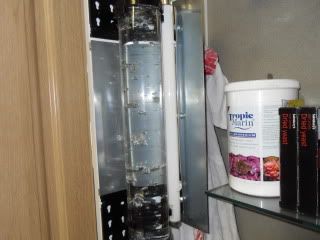
Aquamedic Phytoplankton Reactor attached to the side of cupboard (devoid of its reflector and lighting)
It comes with all the necessary items for connection to air-pumps and CO2 regulators. Air-line, non-return valve and drain tap is also provided as is a long cleaning brush. Brackets is also provided to hang or attach the reactor to various surfaces. This is an ideal piece of kit for culturing freshwater algae. The reactor comes in two forms, the first has all the basic kit as described above whilst the deluxe form comes complete with lighting. The lighting is the only difference between the two kits, except that they charge you an extra £100 for the lamp and fitting which is not a specialist horticulturalist lamp. So with my DIY cap on I have fashioned a reflector bracket and used readily available, off the shelf, items to illuminate the reactor for around a ¼ of the mfgs. price. The added advantage of using such a specifically designed reactor is that the air insertion tubing and valve comes in from the bottom of the tube which has conical tapering both top and bottom this will ensure that the algae is always kept in suspension as intended. Much better dispersion than the old flat bottomed jars I have in the cupboard.
Water Chemistry;
Water chemistry is still a little hit and miss affair with so many variables to consider but for me presently I utilise 50% Tap water – 50% Boiled Rainwater, buffered to around pH7.5. This seems to work best for me after many permutations. The tap-water in my locality is very hard. The reactor will take around 2.5 litres of this water when full. I know this method works for me but that may be just down to my tap and rainwater mix offering somewhere near to ideal conditions for the algae to bloom. Another method with some credence suggests the use of distilled water with chemical additives as relayed below;
1g Ammonium nitrate
0.2g Magnesium Sulphate
0.2g Potassium Chloride
A trace of Ferric Chloride
adjust to pH7 and inoculate with Chlorella then keep in a well lit area.
I cannot vouch for this alternative recipe but it may work for others that have tried my method and failed.
Water Movement;
As previously mentioned the method of agitation is still provided by a trusty air-pump. This now enters the reactor from the bottom of its conical taper and keeps the algae in constant suspension with no settlement or dead areas as previously encountered. A drain plug and tap on the reactor itself means I can withdraw the amount of algae I need for any specific feeding.
Foods and Feeding;
Now we arrive at what I consider to be the most fundamentally important requisite in culturing algae successfully in the home. Yes it is true that all the other factors are important and play their part but without the proper food source that the algae can grow and assimilate on then we are going no-where. After much searching and trialling of plant food substitutes I remembered back to my time in marine keeping and growing brine-shrimp and marine copepods to a reasonable size for both fish and corals to feed upon. A liquid food substance known as Guillards F2 Solution presented itself through my many searches.
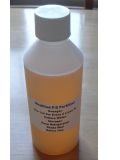
f/2 Medium. (Guillard and Ryther 1962, Guillard 1975) - macro algae nutrient
ccmp.bigelow.org/node/79
This fluid was golden in colour, chemically made up from various substances into a food for marine phytoplankton it also transposes and serves well for freshwater algal counterparts. This was the holy grail for me, I had now found, what I hoped was the key to being able to churn out culture after culture of an emerald liquid of a good consistency on which to feed my many cultures. This was my eureka moment in the quest. The F2 Solution is fed at 1ml for every two litres of culture water and will take around 7-10 days before it is of a nice density to harvest.
Illumination;
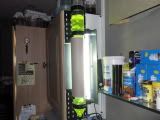
Lighting for the towering bio-reactor was provided by a readily available Juwel brand 15w Daylight spectrum florescent tube with starter gear box. The only problem was I had to manufacture a holding bracket for the reflector so that it would be close to the Phytoplankton reactor tube and become an effective part of the setup. (see images below of the fabrication process)
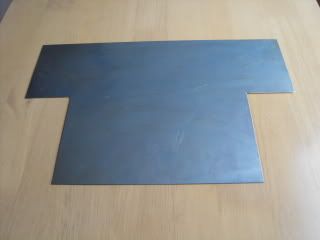
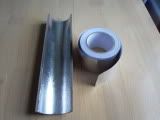
Initial cut dimensions of a sheet of aluminium which I then formed to make the reflector bracket.
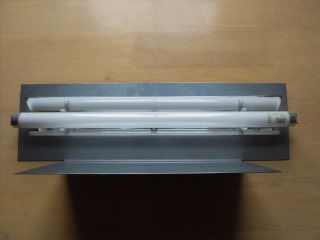
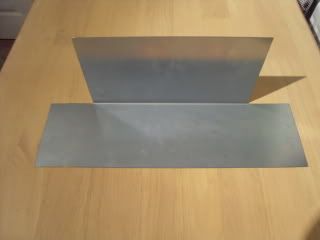
The finished article lighting reflector with 15watt Daylight tube fitted and finally installed behind the reactor awaiting electrical connection.
I found that the light being shone through the acrylic cylinder was being wasted as the beam would be displaced in all directions around the garage, and not solely concentrated entirely on the cylinder.
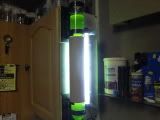
So I made a makeshift "counter reflector" made from a 3" thick walled cardboard tube (sliced in half down its length) This was lined with reflective silver tape. The object of the exercise was to confine as much light as possible within the tube. See image of self styled "counter reflector" below.
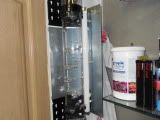
This reflector slips nicely around the opposite side of the tube to the light source thus giving more concentrated light to the developing algae culture.
Temperature;
Again the light source would also become my method of heating the vessel. I’m in a pretty cool garage environment and the reactor is now strapped to the outside of the cupboard so no insulation is present. The 15w tube would have to be almost touching the reactor tube to stand any chance of heat transferral. I have managed to accomplish this with ease and the Phytoplankton reactor core temperature operates at 72’F
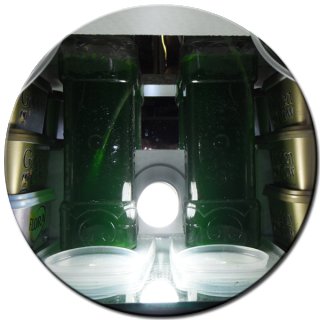
See Images below of the Phytoplankton Reactor in full production mode.
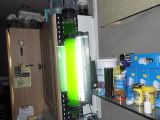
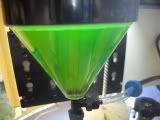
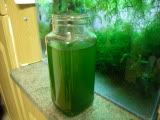
Daily stages of algal development and growth including harvest
Summary:
This has been a fairly lengthy journey to get to this stage, all is not finished as I believe there is still a little work and research to be done on the water chemistry side of things. This coupled with the addition of CO2 will be an ongoing labour of love for me as I try to make more discoveries in this fascinating subject matter. Who would have thought that a simple incursion into the wanton desire to culture Daphnia would lead to such a web of complexities? , Something that I have enjoyed very much thus far. This topic has captivated and intrigued me no end and with no background in the subject matter whatsoever I have strived to make inroads into a very thought provoking topic. There will be others who will undoubtedly disagree with some points made in this article, I cannot comment on those as I’m only privy to my own personal experiences. It is also true that daphnia can be cultured using various feeding methods. Yes we can feed daphnia on concoctions of yeast (I’ve tried it, it works) but it can be overfed leading to fouling the culture vessels and wiping out an otherwise healthy daphnia culture. Subsequently I don’t feel that the daphnia produced via those methods offer as healthy and vibrant a specimen as one raised on live algae.
Regards
Colin