
Retirement and forum shutdown (17 Jan 2022)
Hi,
John Howell who has managed the forum for years is getting on and wishes to retire from the role of managing it.
Over the years, he has managed the forum through good days and bad days and he has always been fair.
He has managed to bring his passion for fish keeping to the forum and keep it going for so long.
I wish to thank John for his hard work in keeping the forum going.
With John wishing to "retire" from the role of managing the forum and the forum receiving very little traffic, I think we must agree that forum has come to a natural conclusion and it's time to put it to rest.
I am proposing that the forum be made read-only from March 2022 onwards and that no new users or content be created. The website is still registered for several more years, so the content will still be accessible but no new topics or replies will be allowed.
If there is interest from the ITFS or other fish keeping clubs, we may redirect traffic to them or to a Facebook group but will not actively manage it.
I'd like to thank everyone over the years who helped with forum, posted a reply, started a new topic, ask a question and helped a newbie in fish keeping. And thank you to the sponsors who helped us along the away. Hopefully it made the hobby stronger.
I'd especially like to thank John Howell and Valerie Rousseau for all of their contributions, without them the forum would have never been has successful.
Thank you
Darragh Sherwin
Super Simple Brineshrimp Hatchery
- Puddlefish (Colin McCourt)
-
 Topic Author
- Offline
- Senior Member
-

- Posts: 347
- Thank you received: 10
The receptacles used can either be from a commercial source or made in the home by the hobbyist.
There here follows a small pictorial piece on how I personally go about making my Brineshrimp hatcheries.
The best receptacle I have found to date for making such a hatchery is a Sainsburys concentrated fruit juice bottle. It has a very long neck, which is ideally suited for funnelling the shrimp out for feeding.
The items I use for making this item are as follows;
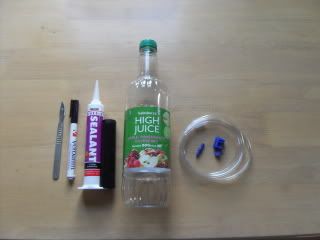
An empty Sainsburys High Juice bottle
A small hobby Knife
A marker Pen
Silicone Sealant
A length of airline
An Algarde straight airline connector
An Algarde airline clamp
Drill with a 7mm Bit
First, I need to remove the label and give the bottle a thorough wash.
Then with a pen I mark out a rectangular section of around 75mm x 25mm
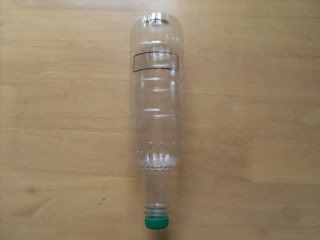
With the hobby Knife I now set about cutting this section out and discard the off-cut.

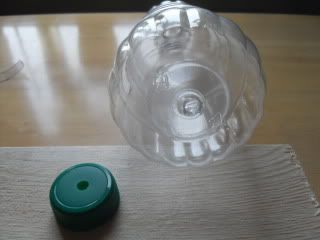
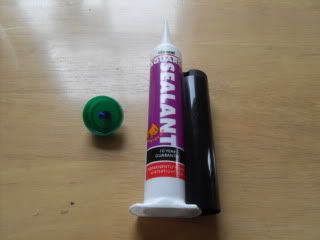
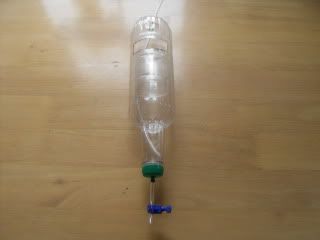
The next job in hand was to drill a 7mm hole in the base of the bottle and the same in the centre of the cap.
An Algarde straight airline connector was then placed through the hole in the cap and sealed into position using everyday aquarium silicone sealant
Once the silicone cured I screwed the cap back onto the bottle and finished off the drain assembly, namely I added a short length of airline to the connector and attached the clamp. A longer length of airline was fed into the bottle all the way down to the neck area, the other end was then attached to the air-pump.
If you are wanting to make a similar unit like this, you now have two choices on how to hang it. You can either drill holes with a pad saw in a shelf and set up the hatchery/s as I have done
or
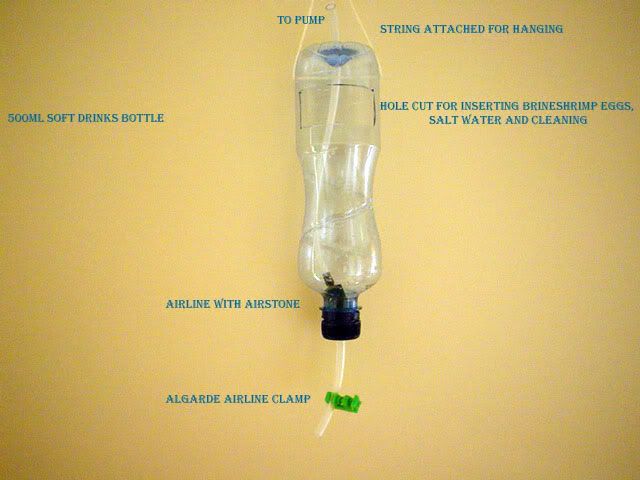
Drill a couple of holes, one either side of the bottle's upturned base and thread some string through. You can now hang this from a hook as seen in the smaller prototype version below.
To harvest the shrimp I place a jam pot or similar with a cotton handkerchief draped over the top beneath the drain assembly. I turn off the air supply and let the contents settle. The majority of the newly hatched shrimp will make their way into down into the neck area, where its simply a matter of opening and closing the clamp for the amount of nauplii you require. I then flush this with freshwater and dip the handkerchief into the fry tubs.
I hope you have enjoyed this little pictorial account of how to make a simple brineshrimp hatchery for little or no outlay.
Admittedly the above account is aimed more at the novice fish breeding enthusiast rather than the professional but I hope there is something in it for everyone
Regards
C
Please Log in to join the conversation.
- dar (darren curry)
-

- Offline
- Platinum Member
-

- Posts: 1539
- Thank you received: 17
Check out the angling section, it is fantastic
Please Log in to join the conversation.
- mossy (gavin blanchfield)
-

- Offline
- Premium Member
-

- Posts: 629
- Thank you received: 26
handy way of doing it,u explained it well
rgds
Please Log in to join the conversation.
- Denis (Denis Goulding)
- Offline
- Junior Member
-

- Posts: 215
- Thank you received: 0
Denis
Please Log in to join the conversation.
- Puddlefish (Colin McCourt)
-
Topic Author
- Offline
- Senior Member
-
- Posts: 347
- Thank you received: 10
LOLcould i use any bottle? as a trip to sainsburys will cost me a bomb in petrol
Any bottle will do but one with a longer neck I found to be better
Regards
C
Please Log in to join the conversation.
- mossy (gavin blanchfield)
-
- Offline
- Premium Member
-
- Posts: 629
- Thank you received: 26
there would be a smell of apples off the shrimp;)
Please Log in to join the conversation.
- joey (joe watson)
-

- Offline
- Premium Member
-
- Posts: 673
- Thank you received: 36
i tried hatching them in something similar onlt i didn't drill holes in the bottom just weighed an air stone down into the neck. you idea is better as draining is very easy and probably the best thought out way as far as being very user friendly. well done i will try this way when i get hold of some silicone just wondering if you could post up details of salt:water ratio, what salt and lighting/heating and airflow details for the best yield (not even half of mine hatched but the bottle was sat in the sump in the dark
Location: Portlaoise, Midlands
Please Log in to join the conversation.
- Viperbot (Jason Hughes)
-

- Offline
- Platinum Member
-
- Posts: 1597
- Thank you received: 42
Jay
Location: Finglas, North Dublin.
Life
may not be the party we hoped for, but while we
are here we might as well dance.
Please Log in to join the conversation.
- Puddlefish (Colin McCourt)
-
Topic Author
- Offline
- Senior Member
-
- Posts: 347
- Thank you received: 10
What temp do you hatch them at and do you need a light?
First up you need 4 requisites for hatching brineshrimp cysts.
1. Air; for water agitation (the cysts need to be suspended)
2. Saline solution; (I personally use about 6 large teaspoons of Cooking Salt not Table Salt to a litre of tap water). If your tap water has a low pH the add a small amount of Bicarbonate of Soda to bring it to about 8. With the use of a refractometer I keep adding enough salt and to bring the Specific Gravity to 1.026 (You dont really need to get this technical though)
3. Light; Light is needed to trigger the hatching mechanism.
4. Heat; Brineshrimp need a pretty high temp if you wish them to hatch quickly 78'F will hatch you a batch in under 24 hrs depending on species.
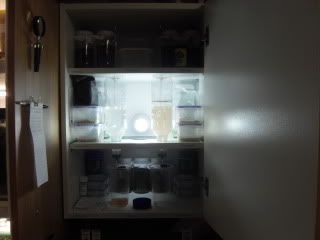
I have a live food cupboard into which I have fitted a light bulb, its a 15w Daylight spectrum energy saver mini twist 6500K this is left on 24/7 and provides both heat and light not only to hatch my brineshrimp but also to culture green water for my Daphnia, ideal heated conditions to culture Paramoecium, Microworm, Bananaworm, Fruitfly and Grindalworm.
I hope that was of some help
Regards
C
Please Log in to join the conversation.
- Posts: 1420
- Thank you received: 2
thanks for sharing you should write a book on all these io for one would be very interested in getting hold of this
Mickey
Mickey Wallace & Cath Woods
Please Log in to join the conversation.
- JohnH (John)
-

- Offline
- Administrator
-

- Posts: 6067
- Thank you received: 857
Did you buy that light bulb 'up North'? - I've been looking out for these for literally ages.
John
Location:
N. Tipp
We're just two lost souls swimming in a fish bowl - year after year.
ITFS member.
It's a long way to Tipperary.
Please Log in to join the conversation.
- Posts: 1420
- Thank you received: 2
i am not sure but may have seen them in B&Q have a look at www.diy.com there is a store in tallaght i think.
the other place might be in a reptile section of pet shops. but i am proply mixing my lights up!!!
mickey
Mickey Wallace & Cath Woods
Please Log in to join the conversation.
- Puddlefish (Colin McCourt)
-
Topic Author
- Offline
- Senior Member
-
- Posts: 347
- Thank you received: 10
I tried sourcing them locally, I searched everywhere including all the major DIY establishments but all they had was warm white.
I eventually got them over the Internet from BLT Direct
www.bltdirect.com/products.php?cat=1856&...aylight+Mini+Spirals
Very prompt transaction and return.
Regards
C
Please Log in to join the conversation.
- Puddlefish (Colin McCourt)
-
Topic Author
- Offline
- Senior Member
-
- Posts: 347
- Thank you received: 10
Hi C,
thanks for sharing you should write a book on all these io for one would be very interested in getting hold of this
 It's been mentioned before Mickey.
I may consider a little .pdf E-Book at some stage.
Thanks for looking
Regards
C
Please Log in to join the conversation.
- JohnH (John)
-
- Offline
- Administrator
-
- Posts: 6067
- Thank you received: 857
I tried sourcing them locally, I searched everywhere including all the major DIY establishments but all they had was warm white.
Yes,
That was what I found down here also, no daylights - only warm whites.
Thanks for the link, I'll look them up in the morning.
John
Location:
N. Tipp
We're just two lost souls swimming in a fish bowl - year after year.
ITFS member.
It's a long way to Tipperary.
Please Log in to join the conversation.