
Retirement and forum shutdown (17 Jan 2022)
Hi,
John Howell who has managed the forum for years is getting on and wishes to retire from the role of managing it.
Over the years, he has managed the forum through good days and bad days and he has always been fair.
He has managed to bring his passion for fish keeping to the forum and keep it going for so long.
I wish to thank John for his hard work in keeping the forum going.
With John wishing to "retire" from the role of managing the forum and the forum receiving very little traffic, I think we must agree that forum has come to a natural conclusion and it's time to put it to rest.
I am proposing that the forum be made read-only from March 2022 onwards and that no new users or content be created. The website is still registered for several more years, so the content will still be accessible but no new topics or replies will be allowed.
If there is interest from the ITFS or other fish keeping clubs, we may redirect traffic to them or to a Facebook group but will not actively manage it.
I'd like to thank everyone over the years who helped with forum, posted a reply, started a new topic, ask a question and helped a newbie in fish keeping. And thank you to the sponsors who helped us along the away. Hopefully it made the hobby stronger.
I'd especially like to thank John Howell and Valerie Rousseau for all of their contributions, without them the forum would have never been has successful.
Thank you
Darragh Sherwin
Building a 130 lt tank.
- tanks_alot (Denis Coghlan)
- Offline
- Senior Member
-

- Posts: 442
- Thank you received: 0
At the moment the building that I work in is undergoing a bit of a face lift and as a result I have kept my eyes open for spare or discarded glass that I could use to build additional fry tanks.
I was just on my way back from my lunch today when what did my beady eye spy, none other than fours sheets of 200cm * 80cm * 7mm glass. For those of you who like to think in feet that is fours sheets of 6.6ft * 2.6ft * 7mm glass. Three of the sheets are completely intact while the other is missing about a quarter off the end of it. All of the sheets have a slight amount of damage around the edges/corners but I'm sure this can be remedied.
I have never moved so quickly, the glass was in my office within 10 minutes, thank god for lifts other wise I would not have been able to get it up four flights of stairs. Due to the fact that there where four sheets of glass I had to explain to four different sets of co workers, why I was bringing the rubbish from the skip back into the building! I got lots of weird looks!!!
Anyway, now to my question!
What size tank can I build? I am aware that the size of the tank is limited by the thickness of the glass. So this limits me to building a tank based on 7mm glass.
I have built a number of small tanks before and they have all worked well and are still in use to date. This find now allows me to undertake a larger project. At present I have no room in my house for another fish tank but I do have a shed where I can build things!!!!!!! and lots of power tools!!!!
Any comments and suggestions are welcome!!
Lead me not into temptation, For I can find it myself!
Please Log in to join the conversation.
- Anthony (Anthony)
-

- Visitor
-

Steptoe
Please Log in to join the conversation.
- tanks_alot (Denis Coghlan)
- Offline
- Senior Member
-
- Posts: 442
- Thank you received: 0

Lead me not into temptation, For I can find it myself!
Please Log in to join the conversation.
- platty252 (Darren Dalton)
-

- Offline
- Moderator
-

- Posts: 2309
- Thank you received: 127
Sorry 7mm is'nt mentioned as i never came across 7mm before.
I will let you do the math.
2 x 1 x 1 = 5mm glass
2 x 1 x 1.5 = 6 mm glass
2 x 1.5 x 1.5 = 8 mm glass
2.5 x 2 x 2 = 10 mm glass
3 x1 x 1 = 6 mm glass
3 x 1.5 x 1.5 = 8mm glass
3 x 2 x 2 = 12 mm glass
4 x 1.5 x 1.5 = 10mm glass
4 x 2 x 2 = 12 mm glass
6 x any size x 2 feet max. = 12 mm glass preferably 15mm base but not essental.
Please Log in to join the conversation.
- tanks_alot (Denis Coghlan)
- Offline
- Senior Member
-
- Posts: 442
- Thank you received: 0
I stand corrected about the thickness of the glass, after I read the last post, I went upstairs armed with my digital calipers and the glass thickness is in fact 6mm.
So I have been pondering about what I am going to make with the glass!! I have been looking around on the net for DIY Custom Aquarium Glass Thickness Calculator and I found this one on www.about.com . It suggests that I can construct an aquarium of 92cm * 46cm * 34cm. Although this construction requires that I have a 9mm thickness sheet for the bottom, but hopefully this can be remedied by using a flat support under the bottom sheet of glass. They also dont mention anything about a bracing system for the tank. I have only built two tanks to date, one was a small twenty liter tank and the other was about 105 liter and for both I have had a bracing system, for the small one only at the bottom but for the 105 it was braced at the top and bottom.
See pic!


For the proposed tank that I would like to build I would include bracing supports in the form of a wooden frame at the top and bottom of the tank and also include further cross supports in the centre to stop the tank from bowing in the middle. Basically it would be the same design as the tank in the picture above, only bigger.
These are my calculations so far, roughly!!
92cm * 46cm * 34cm = 169280cm3
169280cm3 = 169.3 liters
Also if my cutting list/dimensions are correct I should be able to construct this tank out of one of the 200cm * 80cm sheets of glass.
Cutting diagram!

Comments and suggestion are more than welcome!! Please!!!
Lead me not into temptation, For I can find it myself!
Please Log in to join the conversation.
- tanks_alot (Denis Coghlan)
- Offline
- Senior Member
-
- Posts: 442
- Thank you received: 0
Now to my next question!!
Is the ballast systems used in interior fluorescent lighting kits suitable for aquarium lighting? In the same place that I found he glass I managed to pick up four sets of twin 30w lighting kits. I am aware that the exposed parts would need to be made water proof and similar for the mounts at the end of the tubes, but can they be used effectively for lighting aquariums?
Tomorrow I am hoping to find a TertaTec external 1200 in the skip!!!!!!! Fingers crossed!!!!
Lead me not into temptation, For I can find it myself!
Please Log in to join the conversation.
- tanks_alot (Denis Coghlan)
- Offline
- Senior Member
-
- Posts: 442
- Thank you received: 0
I just had a quick look on aquatics-online.com, and they stock two different types of Arcadia tube holder leads. The first is a basic one and the other is an ultra seal. The fittings that I found fit the standard T8 (26mm 1")diameters bulbs so I see no reason why the ballast should not work. They are also inexpensive so if the ballast does work I am looking forward to making a bit of a saving on the light kits alone. Happy days!!


Lead me not into temptation, For I can find it myself!
Please Log in to join the conversation.
Older, used plate glass is also harder to cut properly, or so i have been told by a glazier, its more prone to breakage (in the wrong place
") ) when you try to cut it, probably a job for your local glass shop.
) when you try to cut it, probably a job for your local glass shop.Good luck anyway, glass is expensive, even better if you can get some free tanks!
Please Log in to join the conversation.
- tanks_alot (Denis Coghlan)
- Offline
- Senior Member
-
- Posts: 442
- Thank you received: 0
With a 30W ballast system, it is possible to add an additional mount/end unit (see above) and run two 15W bulbs instead of a single 30w bulb?
Lead me not into temptation, For I can find it myself!
Please Log in to join the conversation.
- tanks_alot (Denis Coghlan)
- Offline
- Senior Member
-
- Posts: 442
- Thank you received: 0
Anyways onto my next question. For those of you who have made fish tanks in the past, can you recommend a brand name of silicon that I can use to make the seems on the tank. I am aware that they sell, the silicon in the aquatic village but its a touch on the pricey side and far away. I'm sure that there is an alternative that I can buy in a local DIY store and not have to make the 2hr round trip to Britta's.
tanks
Lead me not into temptation, For I can find it myself!
Please Log in to join the conversation.
I found this brand by buying glass (for a tank) in a glaziers in Kimmage, basically i told the guy i was looking for aquarium silicone and couldn't find it anywhere, he told me he had a client who was a professional tank builder and he gave him a call, i cant remember the guys name, and he said the silicone they sold in that shop was the type i should use, and i did, never had a problem with this silicone, the tank is a few years old now.
The main thing is to let the silicone cure properly for at least 72 hours before adding any water, also take ages using tape, just ordinary masking tape is fine, run the tape on the inside of the glass where the silicon will contact to get nice neat lines, it gives the tank a really nice finish if you take your time doing this.
The name of the shop is "Hennessy glass" 266 Kimmage Road Lower, 6w, Tel 4925920. I was down there a couple of months ago and they still stocked it, its just ordinary clear transparent silicone, hopefully they still do, if not ask the guy what to use, they are very helpful.
Please Log in to join the conversation.
- Posts: 1420
- Thank you received: 2
Mickey Wallace & Cath Woods
Please Log in to join the conversation.
- Posts: 1420
- Thank you received: 2
Mickey Wallace & Cath Woods
Please Log in to join the conversation.
- tanks_alot (Denis Coghlan)
- Offline
- Senior Member
-
- Posts: 442
- Thank you received: 0
On a hunch I though I would try Ebay for the silicone. Low and behold there is was.
Aquarium Silicone Sealant CLEAR or BLACK in 310ml tube
I bought three tubes (just in case I want to make more) and with delivery it is costing me 25 euro, plus I dont even have to leave my house. Brilliant, god bless the empire that is eBay!
Lead me not into temptation, For I can find it myself!
Please Log in to join the conversation.
- tanks_alot (Denis Coghlan)
- Offline
- Senior Member
-
- Posts: 442
- Thank you received: 0
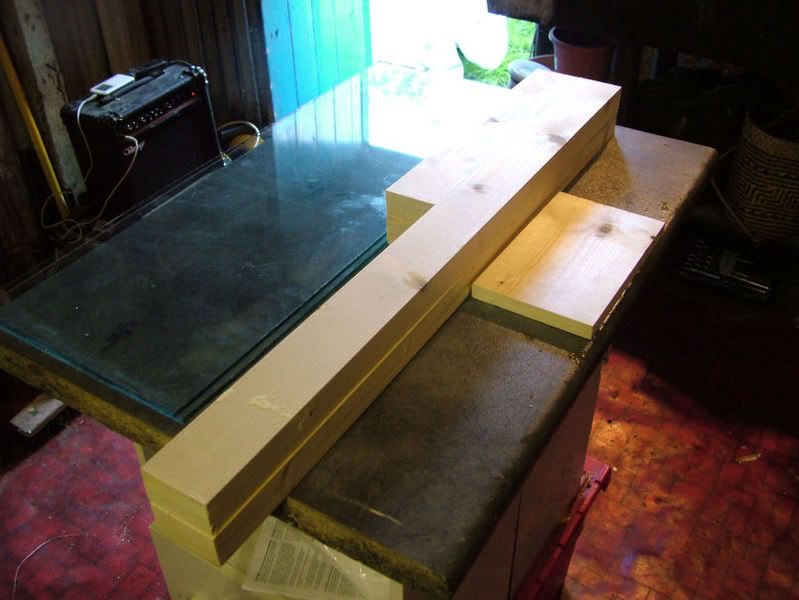
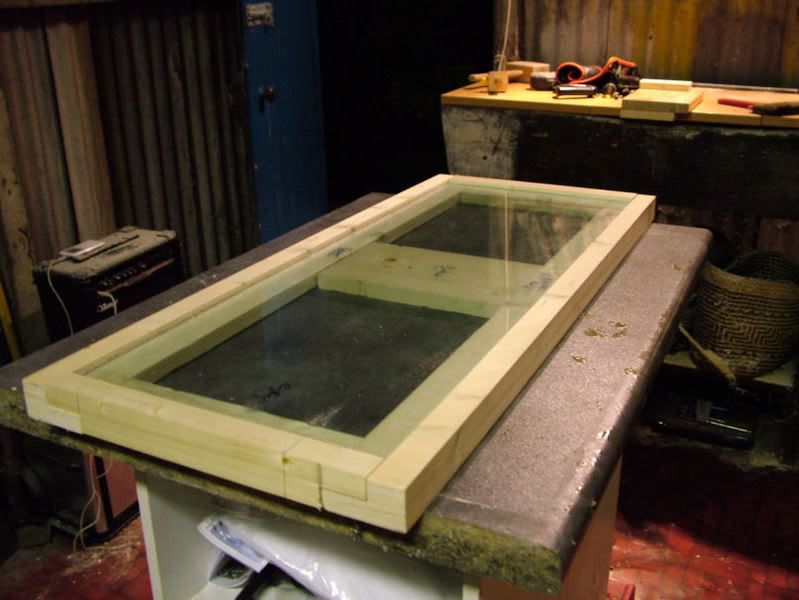
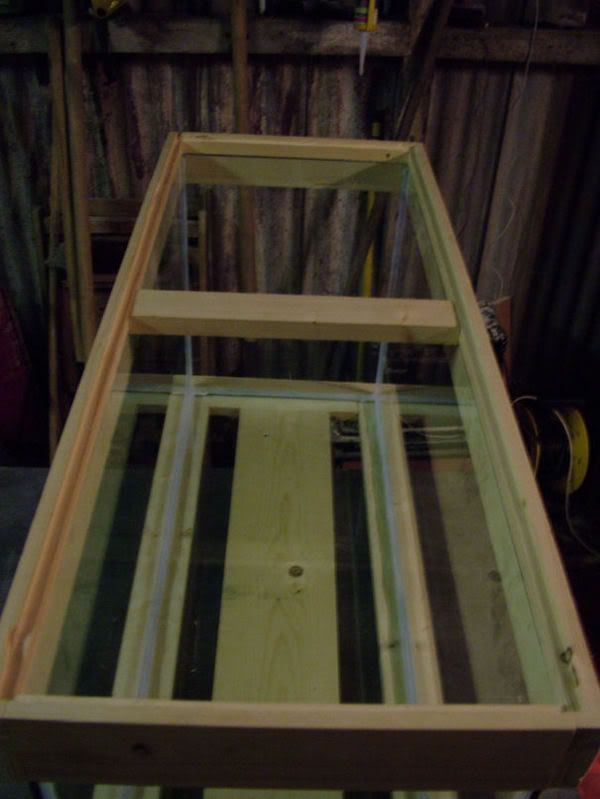
So far I have only constructed the base.
The base is comprised of four length of 3 x 2's and a single length of 6 x 1. The glass being used in the base is two sheet of 6mm glass (still to be adhered together), the dimensions of the sheets are 85cm x 34cm.
I used a router to create a deep lip along the inside of the 3 x 2 lengths for the two sheets of glass to sit in, while also leaving enough of a lip to support the walls of the tank. The four corners are joined together using simple interlocking joints which will be strengthened by screws. The length of 6 x 1 timber sits in the centre of the square to increase support under the glass.
Some pics to show how the progress is going.
All the glass cut from the (6.5ft x 3ft sheets) to be used in the construction of the tank.
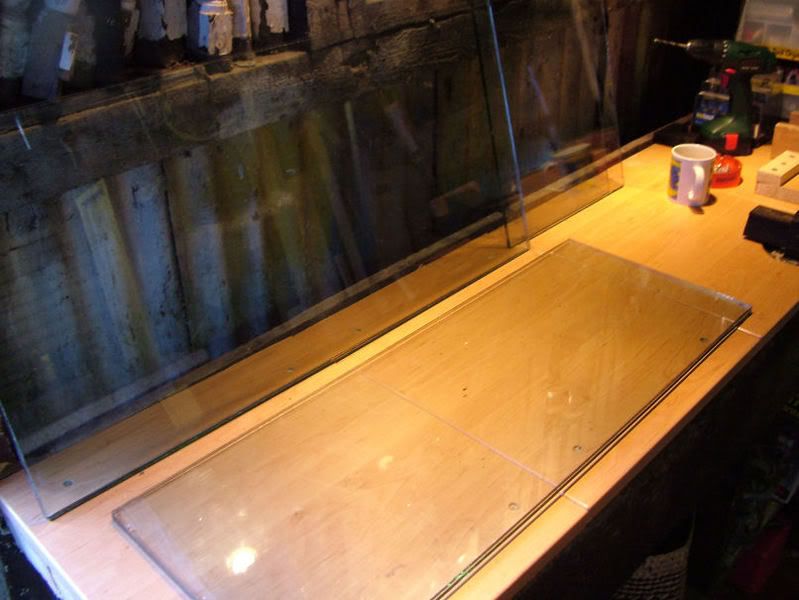
Raw materials used in the base
The semi finished base

Next step will be siliconeing the tank together!!
Lead me not into temptation, For I can find it myself!
Please Log in to join the conversation.
- zebadee (zebadee)
- Offline
- Junior Member
-

- Posts: 88
- Thank you received: 0
Please Log in to join the conversation.
- tanks_alot (Denis Coghlan)
- Offline
- Senior Member
-
- Posts: 442
- Thank you received: 0
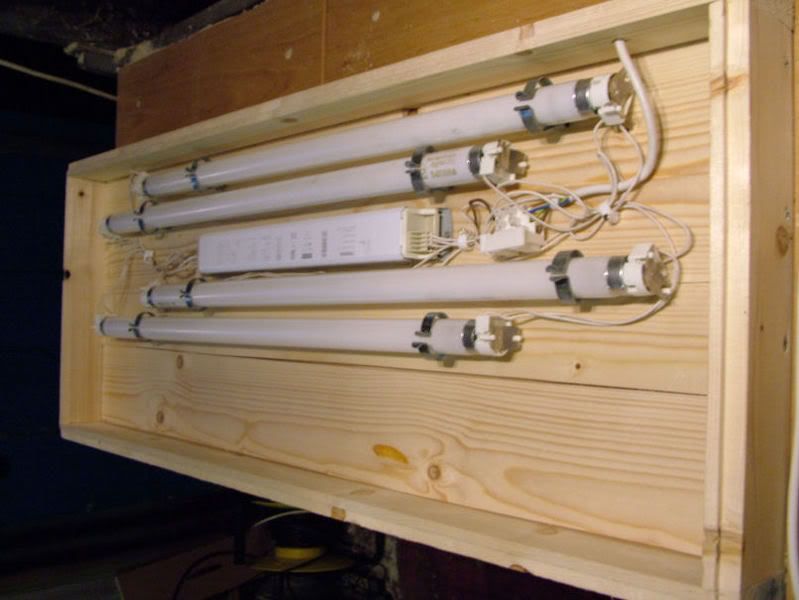
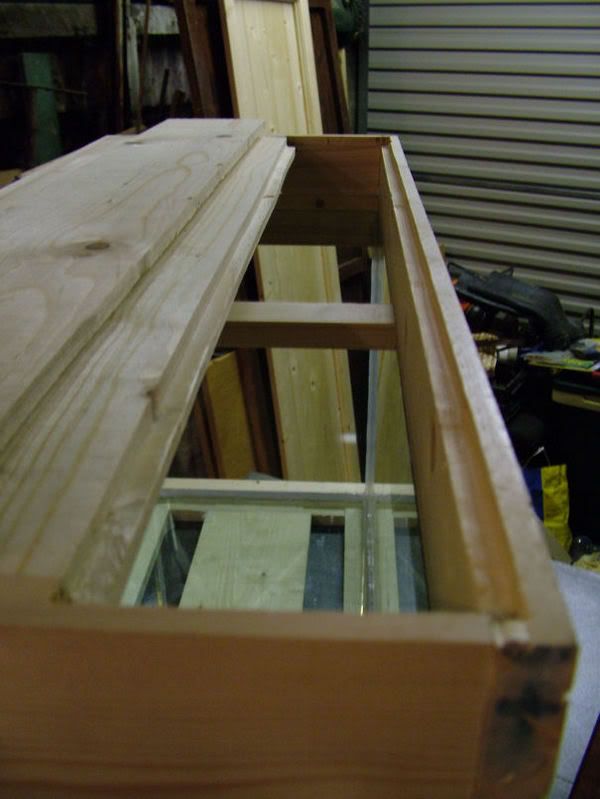
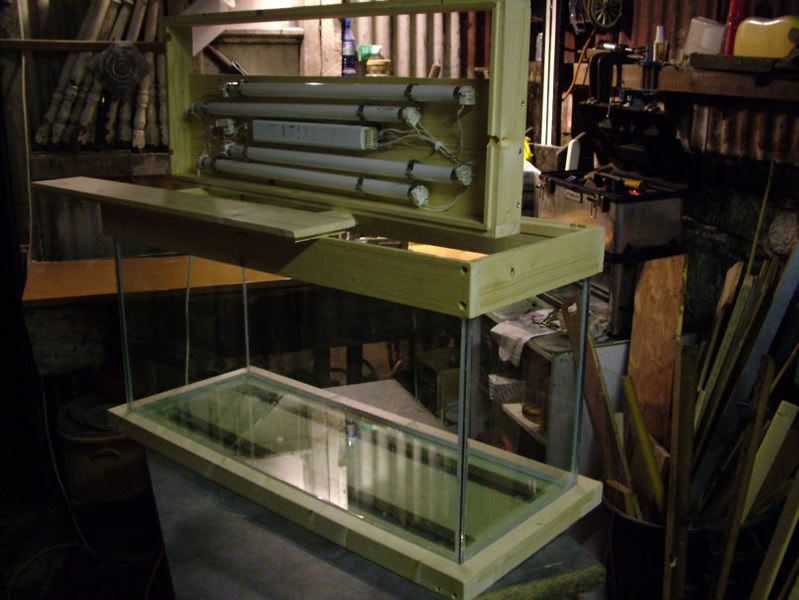
As it stands the majority of the tank is finished. The only things that remains to do are add the waterproof condensation sheet around the light-bulbs and ballast, add a computer cooling fan to help cool the lights and wood fill, sand and varnish the lot.
edit: I also have to add the holes in the hood for the external filter and other cables.
It has been a simple project with the only major hiccup being the smashing of the glass. In total it has taken me about 7 - 8 hours to build. With the addition of varnishing sanding and filling this will most likely go up to about twelve hours. This entire project to date has cost me roughly 35 euro. Which is not bad for a 130 lt tank.
These are a couple of quick snaps that I took last night, sorry about the quality! It will look better when the tank is sanded and varnished (I hope).
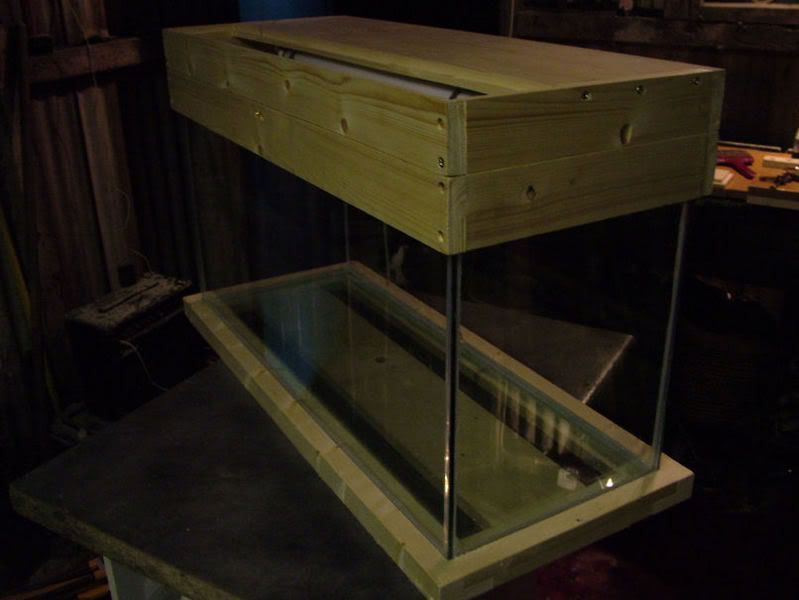
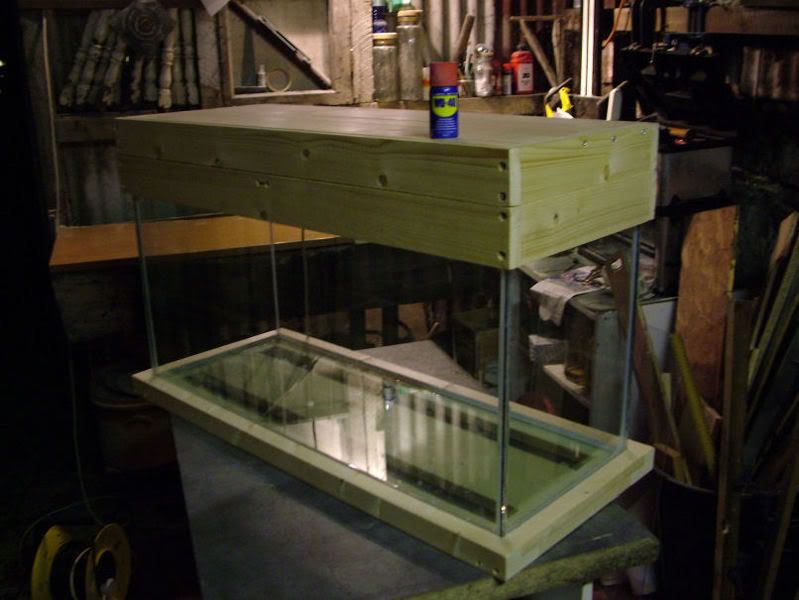
The tank with the top and bottom bracing supports
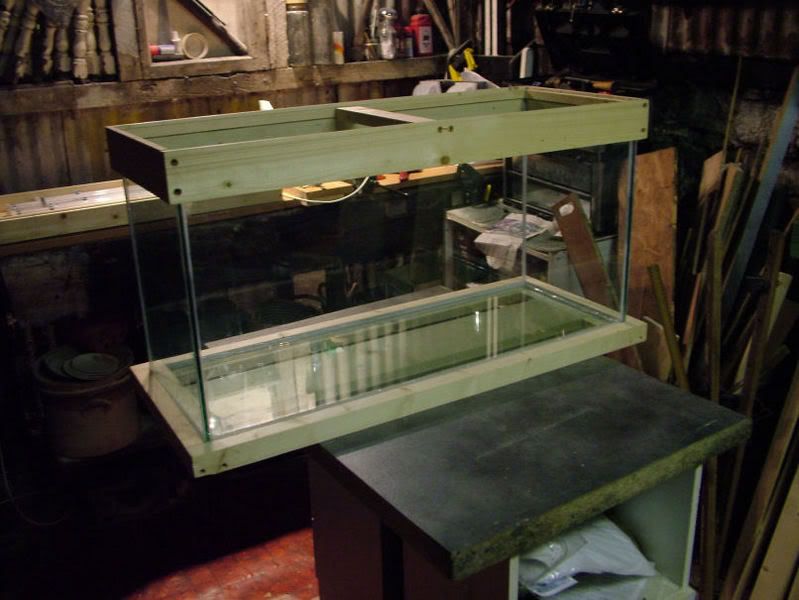
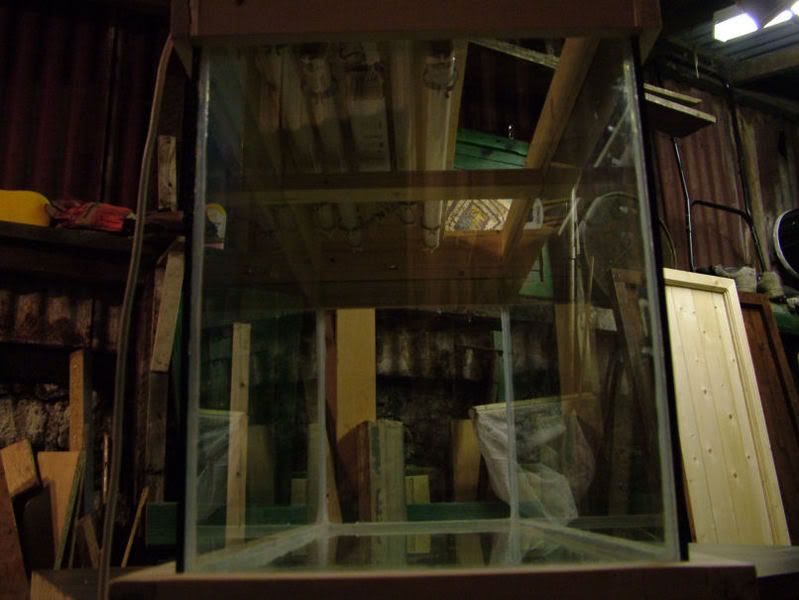
A look on the inside
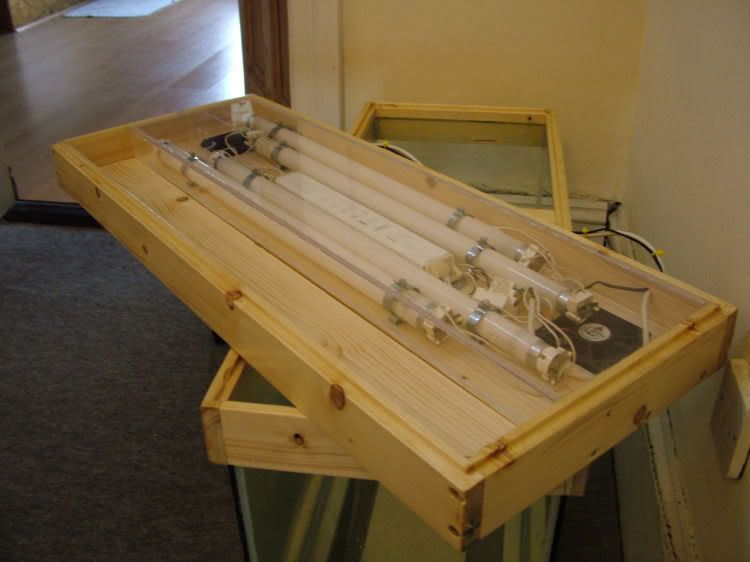
The hood with lighting kit. The lights are 4 x 18W T8's controlled by a digital balast. This gives me about 2.1 WPG. (the waterproof condensation sheet still needs to be added as does the cooling fan).
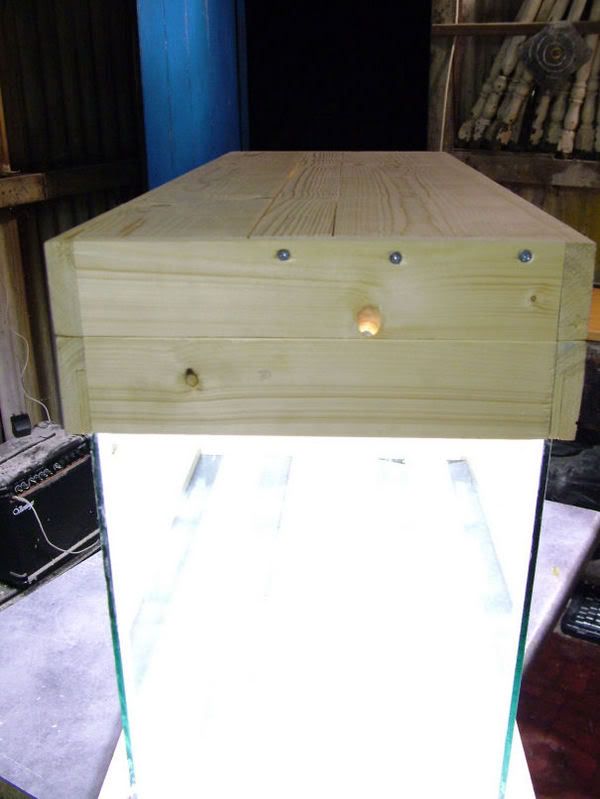
Hood mounted on the frame. (Both edges are routed so the hood sits into the upper bracing support)
Looking up
Lights on!
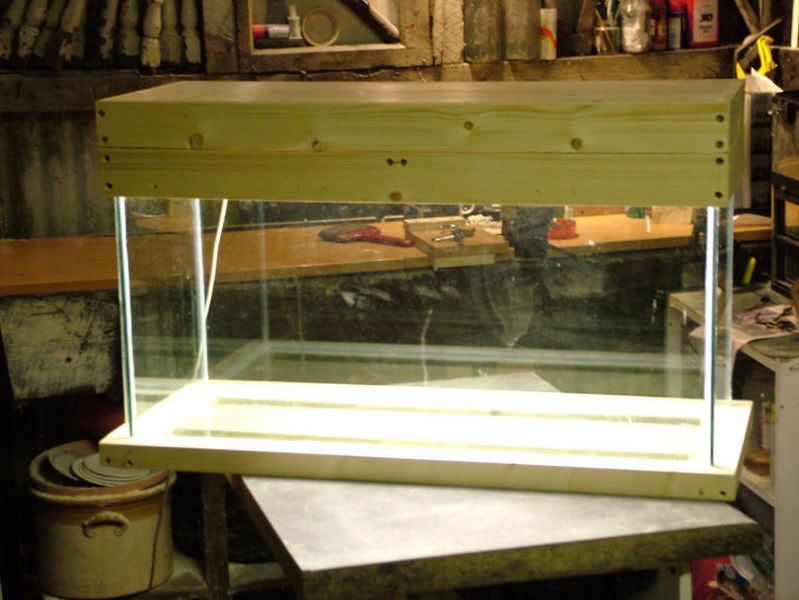
Its bright!!!!! (think I'm going to need Co2)
The feeding access flap (a hinged flap would have been too much trouble)
All together
All the bits!
Comments and suggestions are welcome? I will post some more pics when its finished and it has got fish in it.
Lead me not into temptation, For I can find it myself!
Please Log in to join the conversation.
- Peter OB (Peter O'Brien)
-

- Offline
- Senior Member
-
- Posts: 410
- Thank you received: 0
Could start yourself a little business building custom made tanks.
Smoke me a Kipper, I’ll be back for breakfast.
Please Log in to join the conversation.
- tanks_alot (Denis Coghlan)
- Offline
- Senior Member
-
- Posts: 442
- Thank you received: 0
Next question? What can I use to seal the wooden areas are of the tank that will be subjected to moisture?
Is normal varnish OK or do I have to use marine double polymer (stuff). All if I do use varnish does it have to be non-toxic?
Lead me not into temptation, For I can find it myself!
Please Log in to join the conversation.
- tanks_alot (Denis Coghlan)
- Offline
- Senior Member
-
- Posts: 442
- Thank you received: 0
I also added a protective covering around the light kit. It is constructed out of 4mm perspex that is siliconed together and then inlaid into the hood of the tank. When I initially put the light kit in I noticed that it kicked off a lot of excess heat. This is mainly due to the close proximity of the bulbs and the ballast.
To combat this excess heat I added two 90mm CPU cooling fans in the roof on the hood. The fans run in opposite directions, thus the air is pulled in through one and out through the other. I have tested the cooling system by leaving the lights and cooling fans on all night and the perspex in front of the bulbs was still cool to the touch the next morning.
I also carried out a water test to check the tank seems and they seem to be fine. All that is left to do now is aqua-scape and add the fish.

Lead me not into temptation, For I can find it myself!
Please Log in to join the conversation.
- tanks_alot (Denis Coghlan)
- Offline
- Senior Member
-
- Posts: 442
- Thank you received: 0
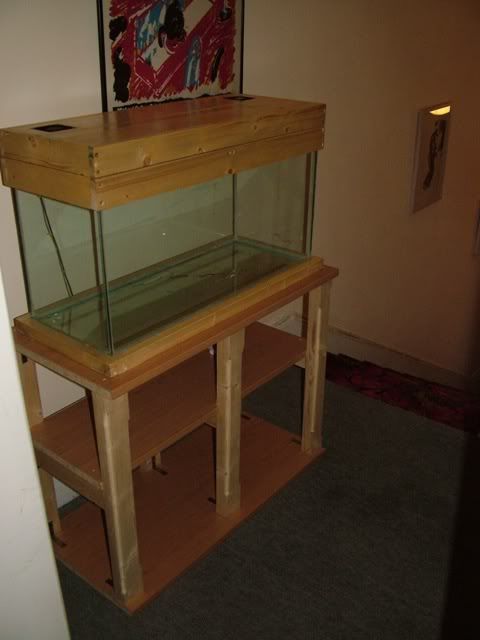
I have just finished building the stand for the tank. It took me the best part of three hours and cost me the almighty sum of 35 euro for the timber. I had the lamenate chip boards already so I didnt have to include that in the cost. Its a simple structure and is similar to the other stands that I have already made. Although with this one I tried to keep it all square so that it would match the look of the tank. It seemed to do the trick.
Let me know what you think.
I know some people are looking at the stand and saying "L-Brackets tut tut tut" thats not enough to support it. Trust me on this, this stand would not be going in my house if I didnt think it was up tp scratch.
and now the pics.


Lead me not into temptation, For I can find it myself!
Please Log in to join the conversation.
- boroughmal (boroughmal)
-
- Visitor
-
make three moulds first & make sure they are consistent to making all surfaces bigger. Run the edge of the tin with a hard lump of metal to smooth the edge.
regards
Just in case
www.pet-bliss.com finishes their special offer at 12 tonight 21% discount so if you wanna new aquarium nows the time to do it. they also have jinlong 2ft deep aquariums on special
Please Log in to join the conversation.
- boroughmal (boroughmal)
-
- Visitor
-
forgot that on ist post
regards
Please Log in to join the conversation.