Retirement and forum shutdown (17 Jan 2022)
Hi,
John Howell who has managed the forum for years is getting on and wishes to retire from the role of managing it.
Over the years, he has managed the forum through good days and bad days and he has always been fair.
He has managed to bring his passion for fish keeping to the forum and keep it going for so long.
I wish to thank John for his hard work in keeping the forum going.
With John wishing to "retire" from the role of managing the forum and the forum receiving very little traffic, I think we must agree that forum has come to a natural conclusion and it's time to put it to rest.
I am proposing that the forum be made read-only from March 2022 onwards and that no new users or content be created. The website is still registered for several more years, so the content will still be accessible but no new topics or replies will be allowed.
If there is interest from the ITFS or other fish keeping clubs, we may redirect traffic to them or to a Facebook group but will not actively manage it.
I'd like to thank everyone over the years who helped with forum, posted a reply, started a new topic, ask a question and helped a newbie in fish keeping. And thank you to the sponsors who helped us along the away. Hopefully it made the hobby stronger.
I'd especially like to thank John Howell and Valerie Rousseau for all of their contributions, without them the forum would have never been has successful.
Thank you
Darragh Sherwin
Upgrading to a new tank - the adventure begins ;)
- Bohrio (Alex Rodriguez)
-
 Topic Author
- Offline
- Premium Member
-

- Posts: 540
- Thank you received: 54
My main concerns where the anemone and my hippo but so far both are doing well.
And I found out what killed the firefish, I found a claw in the tank while cleaning it, it belongs I believe to a stone crab... pretty nasty little creatures so I will make sure I check the rock this week as I didnt have much time today to do it.
The temp tank is bb so it will be easier to clean. Not good news for the hermits I suppose but worse case scenario I will move them with Julio.
Here is a picture of the tank a few minutes after I moved the fish
Link 1
The pistol shrimp is in the little container on the top left as he would not be happy in the tank at the moment.
Also I am using a hang on skimmer now instead of the tunze 9211, easier to set up and quite good, its a bubble magus and it is already skimming stuff despite being in the tank only for a few hours.
Skimmer
Skimmer and ATU
I am so glad I never get rid off stuff lol
I also set up the ATU just for piece of mind and also using the FX5 filter I was using on the old tank, plus one RW8 (I think) wavemaker.
And the GHL Led from my previous tank as well.
Using sachem stability just in case although Ammonia has been 0 all day on both tanks, but just in case.
The old tank is soooo dirty I rather not upload a picture of it. I need to get rid of it ASAP but first I need to empty the live sand which stinks!!!
Now I understand why people would go for a BB tank... everything seem to much cleaner
Please Log in to join the conversation.
- carlowchris (chris)
-

- Offline
- Premium Member
-

- Posts: 640
- Thank you received: 70
Stone crab????thought they were massive great big things???if he grabbed the fire fish are ya not worried he'd grab something else??
I had to pull apart rock to get a,grollia crab ....
Crabs are world champion s at hide and seek.
Please Log in to join the conversation.
- Bohrio (Alex Rodriguez)
-
 Topic Author
- Offline
- Premium Member
-

- Posts: 540
- Thank you received: 54
I was worried for the Jawfish, although he can defend himself quite well hence why he was the first one to relocate to his own tank.
The other fish are quite big so they should be safe for the moment. I saw him when I was moving some rocks and he looks small enough.
Stone crabs are delicious so if I find out he is the cause of the firefish death he will become my sunday snack!
The other big crab I have will go in my sump, he has never bothered anything and until I see him killing something I will not get rid of him.. the stone crab will have to do probably... we will see I hate killing animals in general
Bart will be calling over on saturday, can't wait now!
Please Log in to join the conversation.
- carlowchris (chris)
-

- Offline
- Premium Member
-

- Posts: 640
- Thank you received: 70
Please Log in to join the conversation.
- Bohrio (Alex Rodriguez)
-
 Topic Author
- Offline
- Premium Member
-

- Posts: 540
- Thank you received: 54
Indeed! today is the day, long day as well, lots to do!
Please Log in to join the conversation.
- robert (robert carter)
- Offline
- Platinum Member
-

- Posts: 1689
- Thank you received: 113
Please Log in to join the conversation.
- Bohrio (Alex Rodriguez)
-
 Topic Author
- Offline
- Premium Member
-

- Posts: 540
- Thank you received: 54
Ok so the tank is finally in. I still have to finish a few bits and bobs like plumbing, aligning doors and fixing up cabling etc but I will get there eventually. I am in no rush to start putting things in it as I havent decided on the rock landscape (not even the rock that I will be using) and even if I had I wont be ordering it until next month.
I have to say that Bart has been great to work with. He has been very patient for the last 4 months and today was no exception. Tank looks great and I am very happy with the end result.
So a few pictures.
Tank here in the living room while we were bring up the cabinet and rest of the stuff!
Link
Tank on the cabinet without the covers etc
Link
We were only myself and Bart so moving a 100 kg tank (at least) was no easy task and it would have been much more complicated if it wasnt for this little fella here... made our life so much easier
Link
I asked him to built this thing to transport my tank but now he can use it for others as well... He had already though of it but wasnt sure he could find wheels strong enough but he did!
While the tank was in the middle of the room we did some of the plumbing, specially those bits that required gluing and would be of difficult access once the tank is full. We did the 3 drain pipes and the return up to the safety valve.
Every pipe drain and return have a pipe union for easy removal/cleaning. The return pipe has a ball valve to prevent water from the aquarium flowing back into it.
Ignore the main siphon drain as it should be much higher from the bottom of the aquarium I will cut it down when I will have the system running
Link
As you probably know already the overflow is a bean animal type overflow, I dont think there are many of this in Ireland. It is basically a herbie overflow with a second siphon that is only there to act as a normal drain to compensate for flow variations on the main full siphon but, in the event of the water level reaching certain level it will act as a full syphon as well. Full siphons can handle much more flow than normal drains but, in the event of both siphon clogging we also have an third pipe to act as an emergency pipe. This pipe will pour water directly into the return (not as it is shown in the picture) higher than the sump water level so, in case activated, it will make noise which should be enough for me to realize something is not right.
Side
Front
The second siphon is not finish, the pipes are not yet glued as I will do it after testing it. The second pipe is also missing the top part.
to be continued
Please Log in to join the conversation.
- Bohrio (Alex Rodriguez)
-
 Topic Author
- Offline
- Premium Member
-

- Posts: 540
- Thank you received: 54
link
here is how it looks in the sump. As I said is not 100% finish, for instance, the left pipe will be higher up (not so close to the bottom) and the emergecy drain (third from the left) will be pointing right not left.
link
I didnt bother with the return as we were running out of time and it will require some work, I also dont have the design fully finished (I will be splitting the line to try to use only 1 pump to feed several systems, including UV, refugium/frag tank/algae scrubber section, reactors, etc.
link
Here is another picture of the sump where you can see the union joints etc including part of the safety valve for the return and the UV filter (cheap UV from Fish-street)
link
And that's about it, more tomorrow including a bit of the cabling and stuff like thatm Oh and a picture of the tank in his new spot!
link
Oh and thats a 190 cm american fridge on the right (I know who has an american fridge on an apartment...)
The tank is 160 x 65 cm x 65 cm (tank only no overflow) 76 deep with overflow.
Tank with cabinet 162cm x 77cm x ~175 cm tall
Please Log in to join the conversation.
- carlowchris (chris)
-

- Offline
- Premium Member
-

- Posts: 640
- Thank you received: 70
Cool.
Even better than a red sea reefer actually ......they don't come in that size.
Please Log in to join the conversation.
- JohnH (John)
-

- Offline
- Administrator
-

- Posts: 6067
- Thank you received: 857
I'm looking forward to seeing pictures of the tank, up and running, and (of course) stocked).
Thanks or the 'blow-by-blow' account.
John
Location:
N. Tipp
We're just two lost souls swimming in a fish bowl - year after year.
ITFS member.
It's a long way to Tipperary.
Please Log in to join the conversation.
- Bohrio (Alex Rodriguez)
-
 Topic Author
- Offline
- Premium Member
-

- Posts: 540
- Thank you received: 54
I think Red Sea are going in the right direction with their new Reefer and now the max e-series as their previous aquariums, specially the old red sea max were very overpriced IMO and old tech.
The tank wont be up for a while, need to make up my mind with the rock and then the lighting. I was gonna go for kessils 360, but then I saw the new AI 52HD so I thought they could be a good alternative, however, I would need three and that's around 2300 euro of lights so my plan for the moment will be to use my current GHL, get another one second hand for around 500 euro and put them both in the tank. It should be enough for the time being and then upgrade the lighting in summer. If I do this I would be able to buy the apex controller now and sort out all the wiring.
Another thing I will be changing soon is the sump, I have a few ideas in mind but that's for later, this one will be more than enough for the time being.
So continuing with the tank and now moving to the electrical bit at the moment there are only 4 plugs in the tank, they are on the top of the sump underneath the aquarium. We bought them in B&Q, they are quite big but water prove and switchable.
link
My plan is that they will be used as main plug where all the other extensions connect to. Devices such as skimmers, pumps etc will be connected to extensions (apex) not to these plugs. Although at the minute I will just use normal extension leads (until I get the Apex).
For cable management as I mentioned before I asked Bart to create selves on the edges of the aquariums and make wholes in them to pass cables through. The idea is to use this selves to place cables, power supplies etc in a safe place minimizing the risk of falling into the sump. The selves have a protective edge to prevent anything from accidentally falling into the sump.
link
At the moment is of course, not tidy but I will get there eventually.
There was some space to the left of the sump that I wasnt sure what to do with. So I asked Bart to move the side wall further into the sump to create an extra compartment accessible from the outside via a side door.
link
The plan is to put stuff such as Apex controller modules etc here, things that I dont want them to get wet.
link
This section connects to the sump area via another big whole on the top left
link
The side door is a bit heavy so I have already told Bart that we will need to redesign it using some sort of light material with a transparent window so I could have access/visibility to the inside of the area without too much hassle.
Again very happy with the end result. There is still a long way to go though!
Please Log in to join the conversation.
- Jonlate (Jon Late)
-

- Offline
- Senior Member
-

- Posts: 439
- Thank you received: 38
Bart built my tank at about the same time as he built yours, and I also found him very happy to spend time helping get it into the room and set up. Time that he didn't need to spend with me, but did.
I am still jealous that yours is salty, I took a long time to work out which way to go, but at least it gives me an excuse in the future to get another tank.
I thought tropical tank would be cheeper, and going on the cost of your light alone, my tank came in quite cheap!!!
Look forward to seeing it running, but keep the story coming.
Please Log in to join the conversation.
- Bohrio (Alex Rodriguez)
-
 Topic Author
- Offline
- Premium Member
-

- Posts: 540
- Thank you received: 54
Yeah, I know what you mean, I think I remember your tank as well and saying to myself, holly molly thats a deep tank! Always wondered how you got on with it and how you find cleaning such a tall tank.
He also mentioned his experienced with a customer whose tank wouldnt fit through the door/window and his surprised when he started to break the frame of the wall so the tank would fit through lol, as I said, didnt know it was you!
Tank was heavy man, really heavy but we managed in the end without any problems. He spent most of the day in the house setting it up but couldnt get to finish the rest of the plumbing as I didnt have a clear picture of what I wanted, he will come back tomorrow at some point, looking forward to that!
Next step will be rockscape
Please Log in to join the conversation.
- Jonlate (Jon Late)
-

- Offline
- Senior Member
-

- Posts: 439
- Thank you received: 38
I am still trying to learn how to hover the sand without sucking it all up the syphon, but am learning.
I really should update my thread. I will do it later!
But well done with what you have accomplished so far, it looks great.
Please Log in to join the conversation.
- Bohrio (Alex Rodriguez)
-
 Topic Author
- Offline
- Premium Member
-

- Posts: 540
- Thank you received: 54
So Bart came over today and did the plumbing for the return section.
It took over 3 hours but we did it and I am really liking it. It look neat and tidy and not too bulky.
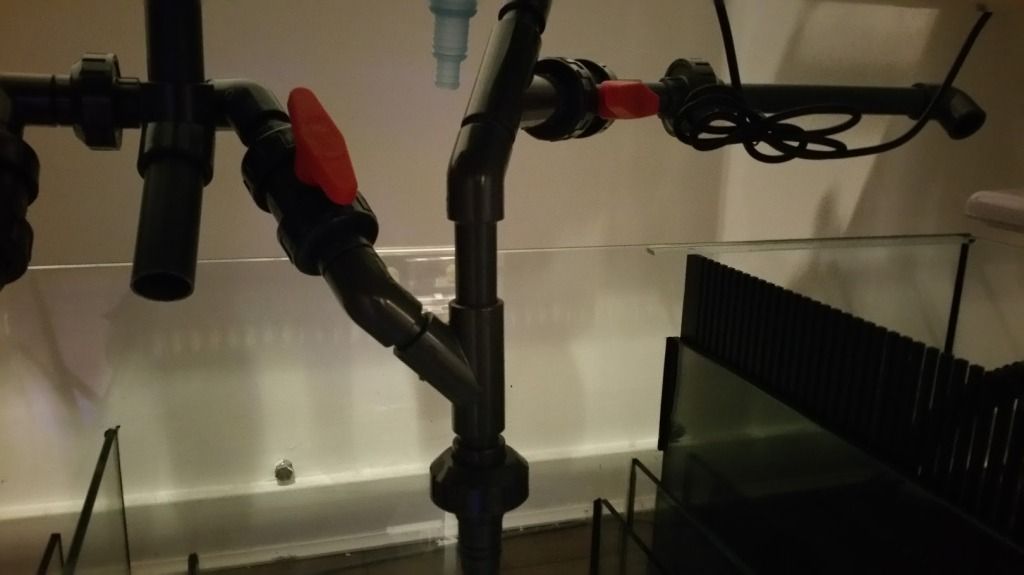
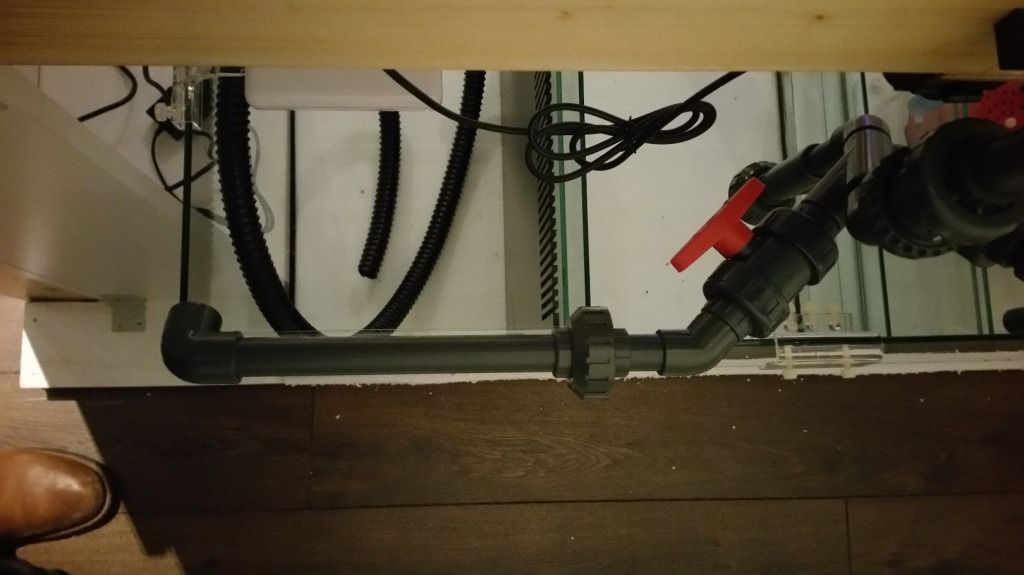
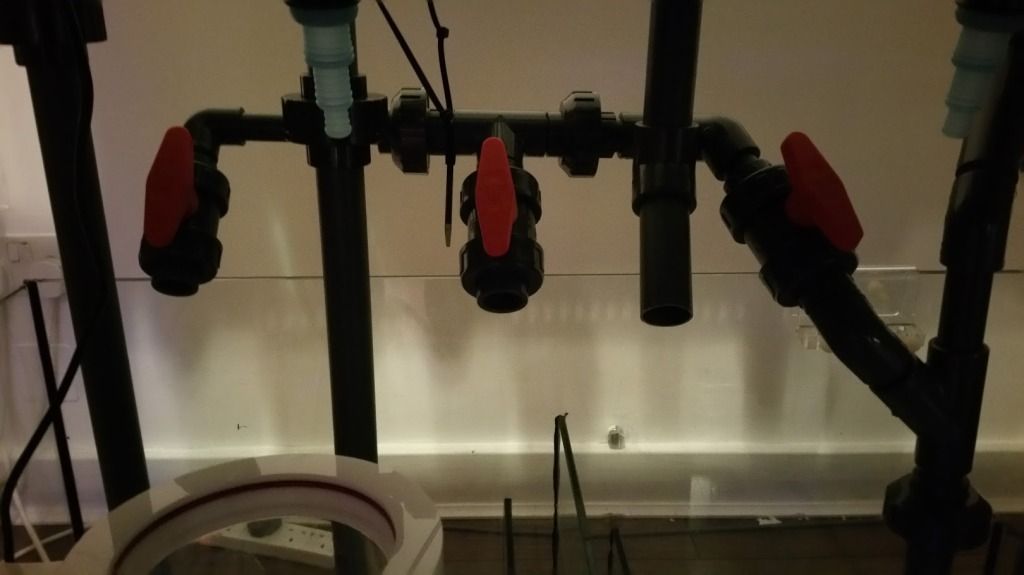
Basically I am planning of using the return pump to feed the algae scrubber (or the left section of the sump), the UV, the tank of course plus reactors or anything that could need a pump to work. All this using the same pump. So after a lot of thinking and removing extra outputs I decided to go for something like the below
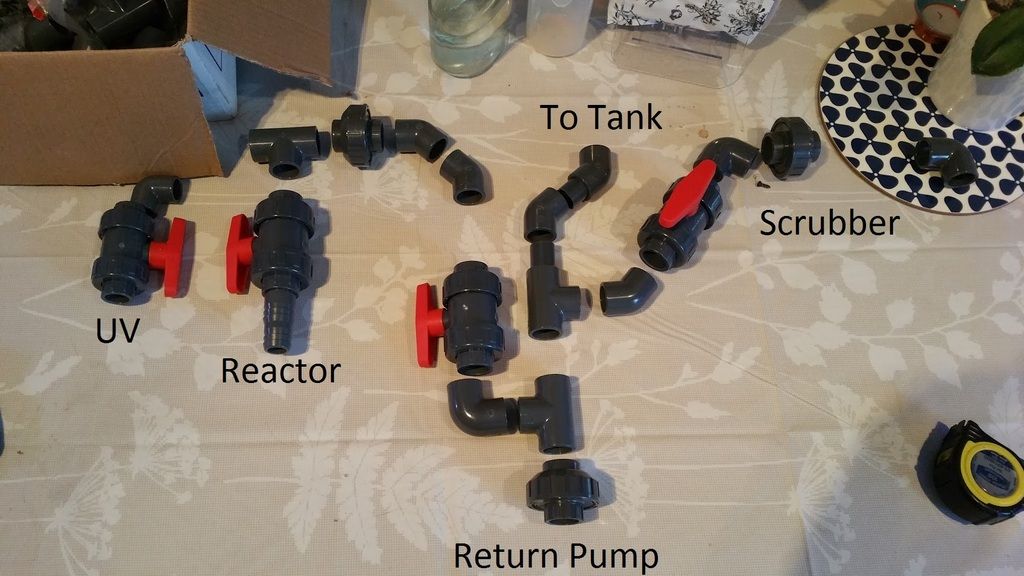
I needed a few parts to complete the design so Bart got them for me in the morning and called over in the early evening.
Like I said, took a few hours but it was worth it!
This is the end result
View from the rear
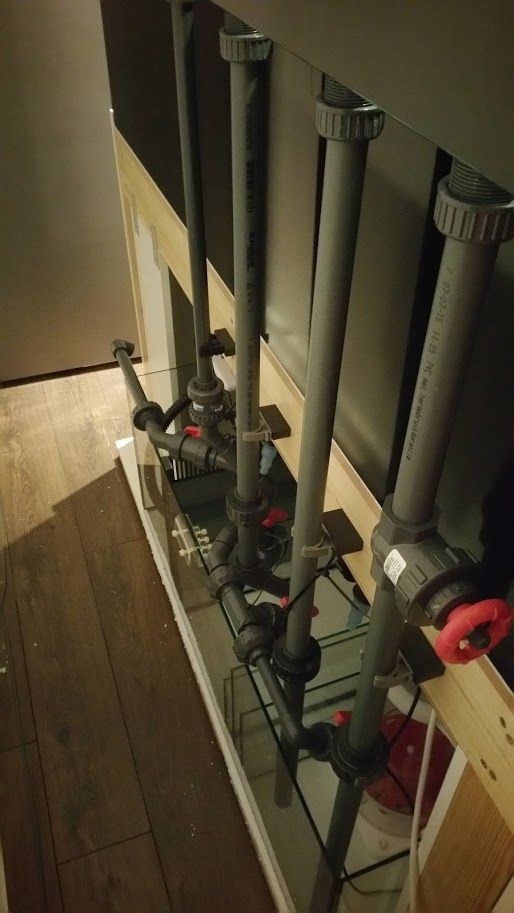
Front
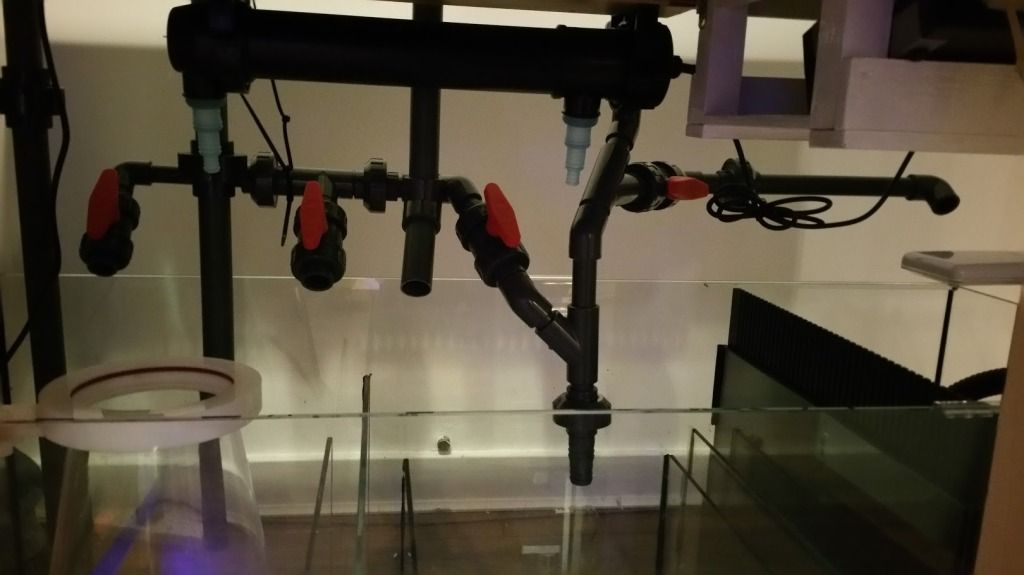
This is a close up of the middle/center of the return from behind.
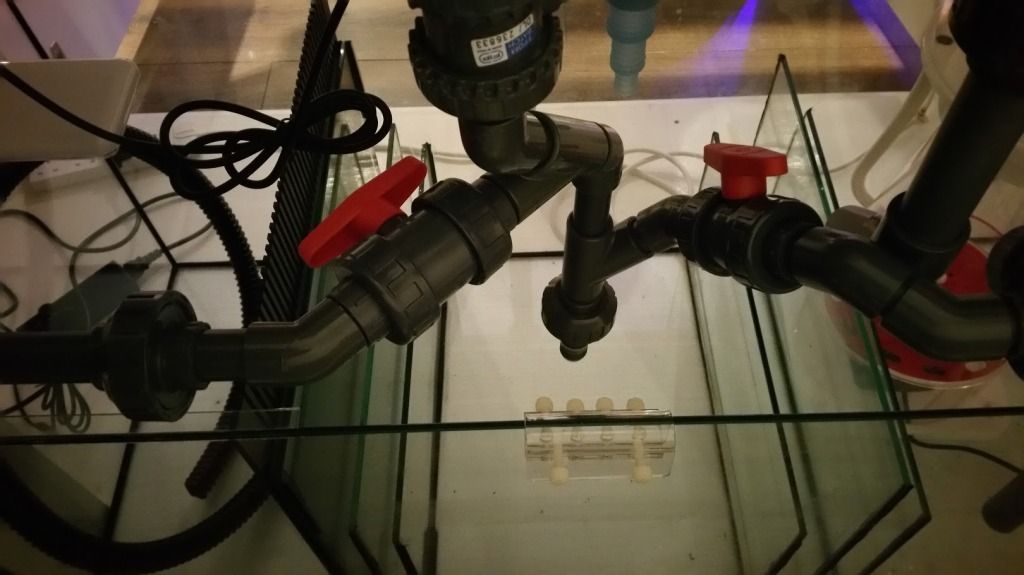
And from the front with the refugium outlet/section
Refugium side with its ball valve
Please Log in to join the conversation.
- Bohrio (Alex Rodriguez)
-
 Topic Author
- Offline
- Premium Member
-

- Posts: 540
- Thank you received: 54
And the left side front view (1 25 mm ball valve and 1 20 mm ball valve).
Rear view
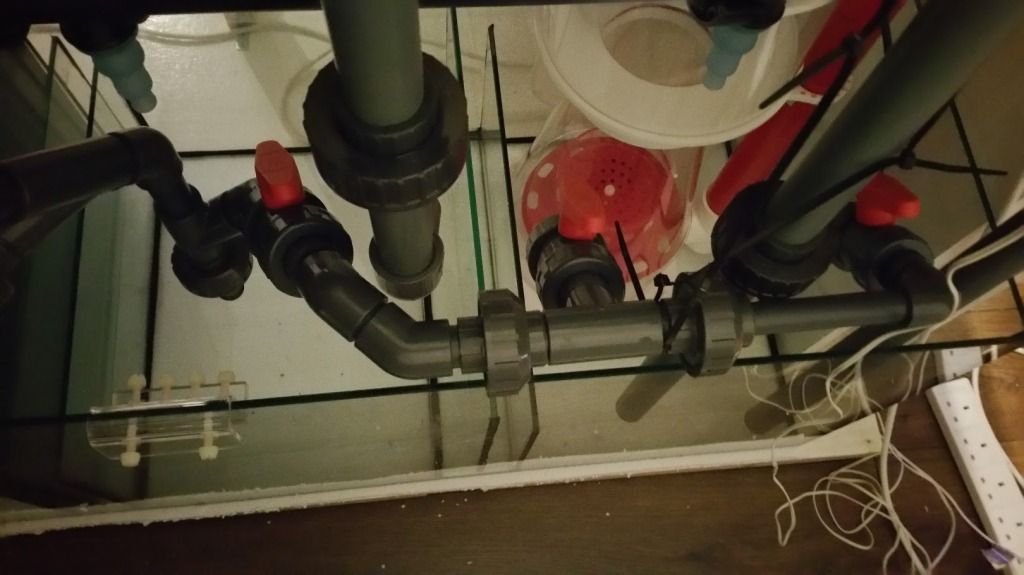
So the plan is to connect the UV to the left ball valve, use the 2nd to the left valve (25 mm) to feed anything basically, for instance, one or two fluidized reactors, or calcium reactor, or ozone, another skimmer etc etc). The ball valve on the right side will just be used to feed the Algae scrubber (when it will be ready) although for now it will just be either a refugium or an extra filtration area.
The return has a few screw connections so I can remove parts of the plumbing without affecting other sections, either for maintenance or just because I need to do an upgrade or modification. Also, the ball valves on the left can rotate up or down for convenience when connecting other devices to it.
Again, very happy with the end result. Next step, testing for leaks (fingers crossed)
Please Log in to join the conversation.
- robert (robert carter)
- Offline
- Platinum Member
-

- Posts: 1689
- Thank you received: 113
Please Log in to join the conversation.
- carlowchris (chris)
-

- Offline
- Premium Member
-

- Posts: 640
- Thank you received: 70
Are you securing that anywhere ??to the wall or anything? ??with all the ball valves is there not alot of weight and a risk of cracking if it's not secured???
Please Log in to join the conversation.
- Bohrio (Alex Rodriguez)
-
 Topic Author
- Offline
- Premium Member
-

- Posts: 540
- Thank you received: 54
Robert is not that complicated although some might consider it expensive, that depends on what you are really aiming for, to me is not, probably the entire plumbing will be around 250-300 euro maybe? plus man hours. I honestly dont know but bear in mind that the big gate valve in the main siphon drain cost around 80 euro! This is an usual plumbing for Ireland although very common in places like USA, in fact, this would be a fairly simple plumbing scenario to their standards!
Chris, yes, the next part will consist in getting a white sheet of wood and fix it to the back of the wall. This will have 2 main missions, first it will allow me to fix the plumbing tubing (or anything that needs to be fixed) onto it to prevent it from cracking etc and second to stop splashing from hitting the wall.
Bart is working on this, we will install it next week he comes over again. I am not sure how is going to work, It might idea so it might turn out to be a total failure! lol
Main problem I see with this type of plumbing is leaks, as there are quite a few ball valves, screw connections etc there is more chance for leaks, hopefully it will be ok after the leak test next week.
Once we get that sorted and make sure there are no more leaks I will fill up the tank with tap water and do a full water test, probably for a week or so. This is mainly to adjust the beananimal overflow system, get an idea of where the water line will be in the tank, and also to re-check for more leaks!
Please Log in to join the conversation.
- ceech (Desmond Gaynor)
-

- Offline
- Premium Member
-

- Posts: 633
- Thank you received: 60
Please Log in to join the conversation.
- ceech (Desmond Gaynor)
-

- Offline
- Premium Member
-

- Posts: 633
- Thank you received: 60
Please Log in to join the conversation.
- Bohrio (Alex Rodriguez)
-
 Topic Author
- Offline
- Premium Member
-

- Posts: 540
- Thank you received: 54
Well hopefully it will look great!
So a few updates, Bart was here today, just to check for leaks and I must say we had a few here and there. Fixed them and we will re-test tomorrow.
In the meanwhile I think it was Chris who was wondering how would I prevent the pipes from breaking because of the plumbing being so heavy.
Well the plan was to put a piece of wood on the wall and to use clips to hang it over it.
So here is the wood sheet on the wall
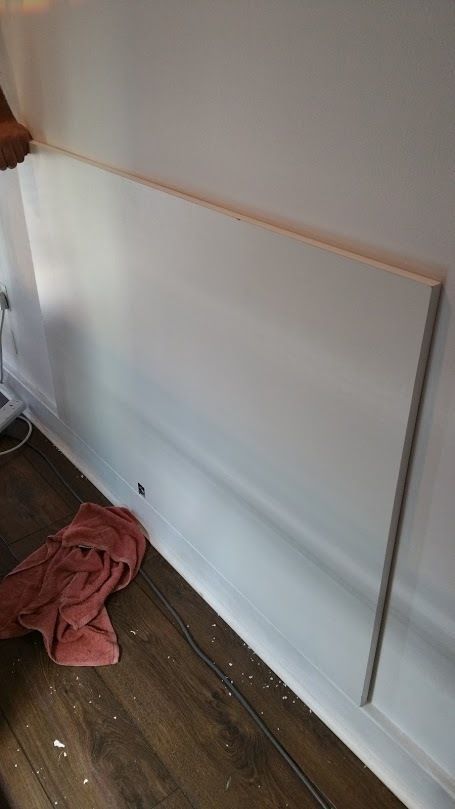
So the tank goes in front and I use this wood to attach pipes, or anything that needs attaching! Kind of like having a closed cabinet with a back wall but in my case the cabinet is fully open.
here is a view from the inside
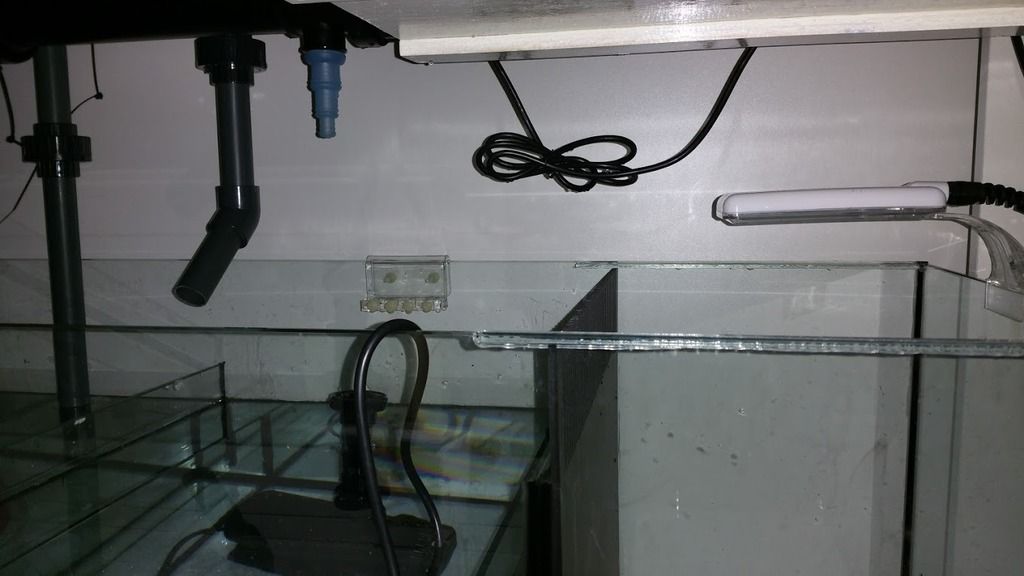
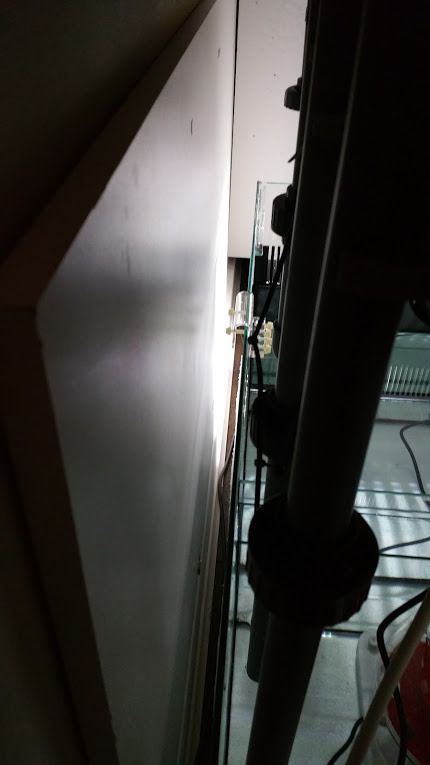
And from outside left side of the aquarium
The idea for the plumbing is to use this plastic clips
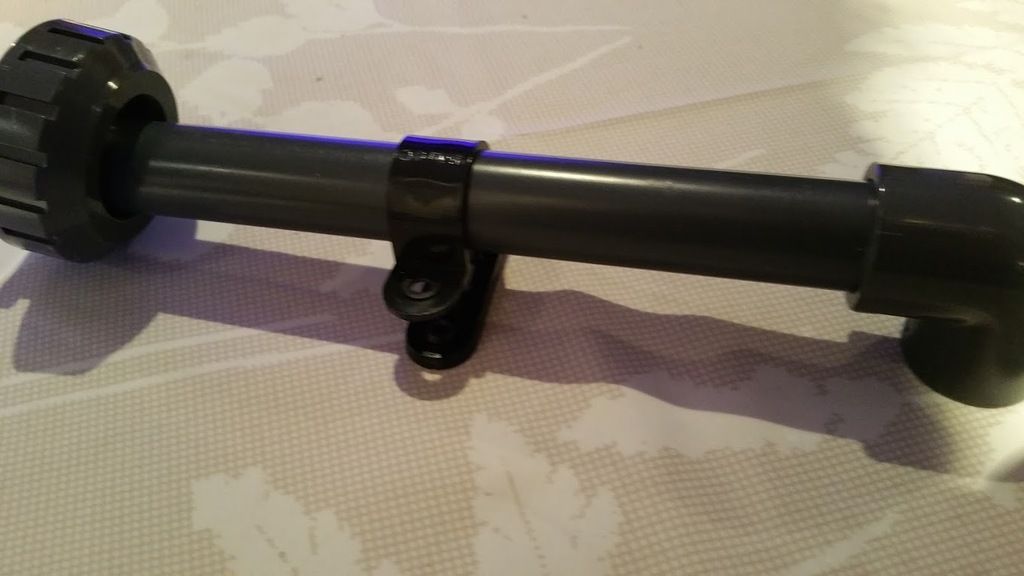
and attach them to the back wall using plastic or wood separators
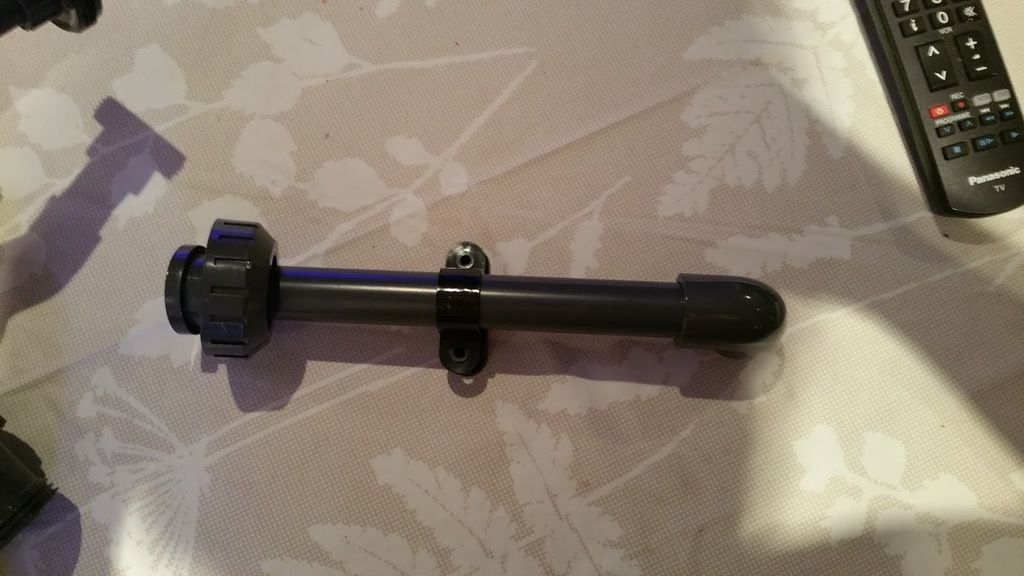
Hopefulyl it will work well
More stuff in a few days
Please Log in to join the conversation.
- jeff (Jeff Scully)
-

- Offline
- Platinum Member
-

- Posts: 1461
- Thank you received: 204
Lucky man fair play
Can't wait to see what you do with it
Where the tongue slips, it speaks the truth.
A life making mistakes is not only more honourable, but more useful than a life spent doing nothing at all.
Please Log in to join the conversation.
- Bohrio (Alex Rodriguez)
-
 Topic Author
- Offline
- Premium Member
-

- Posts: 540
- Thank you received: 54
Anyway there is a lot happening this month, a lot, so much that the tank should be ready before the end of the month
I haven't done anything with the tank yet because I need to sort out the electrical first and I am waiting for a couple of PDU to come from the UK they should be here this week!
For the moment I have just filled the tank up (over 10 cm below the overflow so not fully running) with tap water and let it run, just to see if there are any leveling issues or leaks after transport, so far so good!
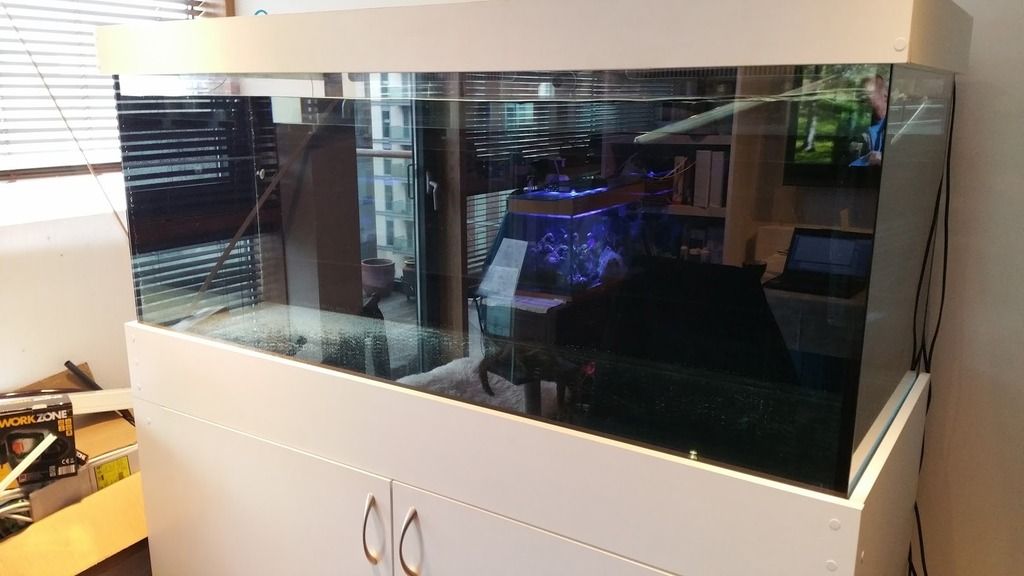
I also decided to remove the no return valve because it was making a bit of noise and in all fairness there was no need for it. But this mean I had to redo the entire return pipe, Bart will help me finish this soon.
The "problem" I have is that everything I need will be arriving sometime between next week and the next one which means I am gonna be very very busy!
Anyway, one thing I did is bought a new UV filter, a blau UV-55 w, pretty big but fits perfectly on the back of the aquarium and it is easy to remove so happy days. I will keep my old but never used UV filter 36w as a replacement.
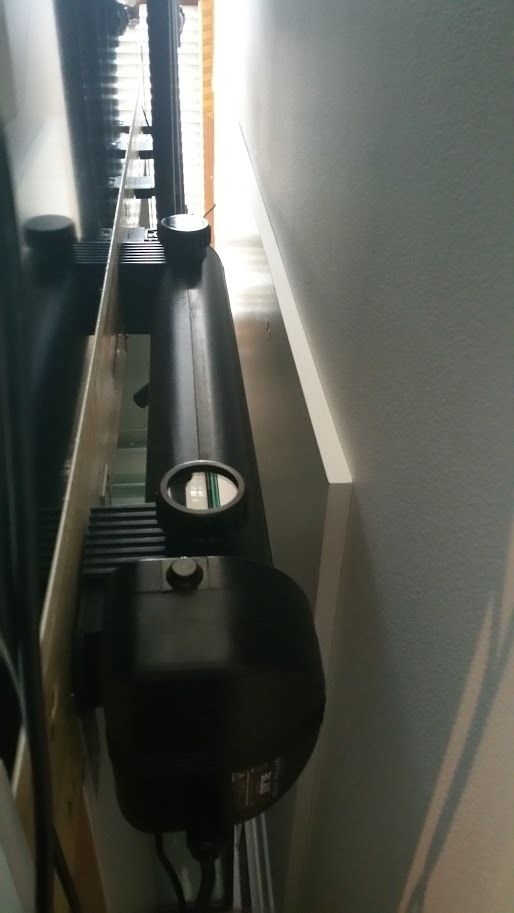
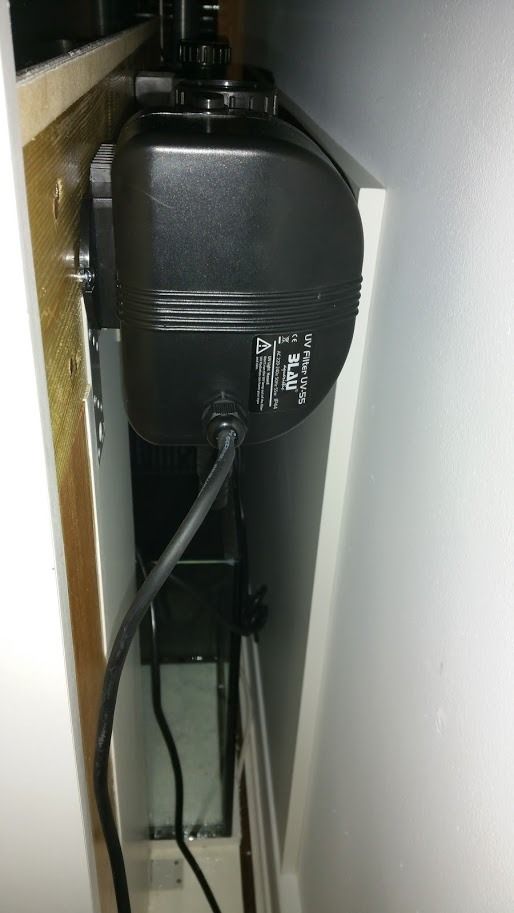
Lights should arrive this week, wont be fixing it to the aquarium until I sort out the electricals and the piping so that is my priority this week.
Another good thing is that we are getting rid off the American Fridge so we bought a new fridge and freezer this weekend that will be place in a different part of the apartment which would leave the entire wall just for the aquarium, it would look so much better as will allow me to leave the right side fully open for people to see when they come into the living room and a bit more extra space on the left side as well!
I will keep you posted, I just wanted to upload this so people wont think I had left the country or something like that!
Please Log in to join the conversation.
- hammie (Neil Hammerton)
-

- Offline
- Platinum Member
-

- Posts: 1204
- Thank you received: 184
Please Log in to join the conversation.
- robert (robert carter)
- Offline
- Platinum Member
-

- Posts: 1689
- Thank you received: 113
Please Log in to join the conversation.
- Bohrio (Alex Rodriguez)
-
 Topic Author
- Offline
- Premium Member
-

- Posts: 540
- Thank you received: 54
You can run as much flow as you want, but the more flow you run the less effective it will be. Its all about maximizing the water contact surface.
Most people don tknow this but ideally you want to aim for 0.5 to 1 w per liter! I have seen german's set ups getting close to this type of systems and they are expensive. Basically they concatenate several UVs one after the other until they reach the desired wattage.
But another reason why people concatenate UV filters is to allow them to put more flow through. For instance, if for 1 filter is recommended 2000 lph, if you put 2 you can double that to 4000 lph, put a third and triple it, etc etc.
See below

I would probably go for something between 1000 lph and 2000 lph for the 55 w model, probably around 700-1200 lph for the 36 w etc etc. I think Deltec's table above gives you a pretty good idea although it is specific to their products.
I am planning on running it somewhere between 1000-2000 lph, my return will be somewhere between 3000-6000 lph so it can't go there, hence why I created that type of return piping to allow me to regulate the flow to meet my requirements. My plan is to either put it before my algae scrubber or feeding into the skimmer section.
Hard to tell, because IMO how a UV filter affects your system is something that is really hard to measure.. As long as you run 1-2 times your tank turnover you will be fine, but no more than that. So if your tank is 500 liters aim for 750 lph and try not to exceed 1000 lph, if you are in doubt always aim for a lower flow. This doesnt mean that this UV cannot handle higher flows, but I just can't be sure.
I can't find any information regarding this UVs recommended flow rates etc, it didnt come with a manual but I dont see any weird design style so I am guessing they will be very similar to the average UV filter. I might contact Blau directly and ask them
Please Log in to join the conversation.
- robert (robert carter)
- Offline
- Platinum Member
-

- Posts: 1689
- Thank you received: 113
Please Log in to join the conversation.
- Bohrio (Alex Rodriguez)
-
 Topic Author
- Offline
- Premium Member
-

- Posts: 540
- Thank you received: 54
You have the 36 w version of this one?
Thats a normal flow rate for a 36 w on freshwater.
I also forgot to mention that flow rate will vary depending on the application, for instance
watts / Bacteria and Algae / Control Parasites / (both gph)
4 / 60 / N/A
8 / 120 / N/A
15 / 230 / 75
18 / 300 / 100
25 / 475 / 150
30 / 525 / 175
40 / 940 / 300
65 / 1700 / 570
Again, this is just an indicative figure, every UV is different.
For instance, see below,
Manufacturer/Model / Watts / Max Gallons / Max Flow Rate
Aqua Ultraviolet / 15 / 500 / 700
Angstrom 2537 / 30 / 500 / 750
Double Helix / 36 / 500 / 500
Emperor Aquatics / 65 / 400 / 952
Emperor Aquatics / 80 / 400 / 1049
Like Hammie said, it is really hard to get a clear answer, but most of the time, in marine aquarium and if you are looking to use a UV for parasite control then get a UV that allows you to run your tank turnover at least 1.5-2 times your tank total volume
Also, the tricky part is to maximize efficiency, for instance, a common use of a UV filter is to put it on your return pipe going to the tank, this IMO is probably the best way of doing it, as it is the closest thing you will get to achieve a 100% tank water volume contact, however, it is hard to find a proper flow rate/wattage combination, most of the UVs out there will require you to slow down the flow too much and if you want to increase the flow you will need greater wattage. Others (like I would probably have to do) will take it off the return section and put it back into the skimmer section of the sump, this doesnt "clean" as much water as the other method as you are likely to re-filter water that you had just "cleaned" a few seconds ago but it does allow you to adjust the UV flow to meet your needs...
In the end, following the manufacturer recommendation is the best way to go, if you are not sure, just play safe and use lower than average flows and that's about it. You normally dont introduce new water to the system very frequently so within a few days the tank water should be completely treated and ran through the UV.
Please Log in to join the conversation.
- robert (robert carter)
- Offline
- Platinum Member
-

- Posts: 1689
- Thank you received: 113
Please Log in to join the conversation.

