
Retirement and forum shutdown (17 Jan 2022)
Hi,
John Howell who has managed the forum for years is getting on and wishes to retire from the role of managing it.
Over the years, he has managed the forum through good days and bad days and he has always been fair.
He has managed to bring his passion for fish keeping to the forum and keep it going for so long.
I wish to thank John for his hard work in keeping the forum going.
With John wishing to "retire" from the role of managing the forum and the forum receiving very little traffic, I think we must agree that forum has come to a natural conclusion and it's time to put it to rest.
I am proposing that the forum be made read-only from March 2022 onwards and that no new users or content be created. The website is still registered for several more years, so the content will still be accessible but no new topics or replies will be allowed.
If there is interest from the ITFS or other fish keeping clubs, we may redirect traffic to them or to a Facebook group but will not actively manage it.
I'd like to thank everyone over the years who helped with forum, posted a reply, started a new topic, ask a question and helped a newbie in fish keeping. And thank you to the sponsors who helped us along the away. Hopefully it made the hobby stronger.
I'd especially like to thank John Howell and Valerie Rousseau for all of their contributions, without them the forum would have never been has successful.
Thank you
Darragh Sherwin
Upgrading to a new tank - the adventure begins ;)
- hammie (Neil Hammerton)
-

- Offline
- Platinum Member
-

- Posts: 1204
- Thank you received: 184
The differences between marine and tropical is night and day with amounts of filtration and amounts of media required!
For instance a bad of jbl phosex ultra will do 100l salt water or 200l fresh water
100ml purigen will treat a 400l fresh water tank or (I think) 200l salt water
I was advised that minimum size of uv I should use on a 180l is 24watt but going bigger would do no harm and would future proof any plans I may have!
Please Log in to join the conversation.
- carlowchris (chris)
-

- Offline
- Premium Member
-

- Posts: 640
- Thank you received: 70
Using a uv in in a pond the uv is used to kill free floating algae spores leaving your water crystal clear...you would still however still have higher nitrates and phosphate s but fresh water fish can usually handle these better..
I. A marine aquarium nitrates and phosphate s are usually as close to zero as possible.....and rather than using the uv to kill algae spores....which it does do.....it main purpose is to kill free floating parasites...
The flow rate is recommend 1-2 times volume of your tank per hour.
Please Log in to join the conversation.
- robert (robert carter)
- Offline
- Platinum Member
-
- Posts: 1689
- Thank you received: 113
Please Log in to join the conversation.
- Bohrio (Alex Rodriguez)
-
 Topic Author
- Offline
- Premium Member
-
- Posts: 540
- Thank you received: 54
You are right, most of the equipment in marine tanks are overkill compared to fresh water, but in the same way, most of the equipment we use such as UV, skimmers, reactors are not really necessary with good tank husbandry, however, it will limit you a bit in regards type of animals you can put in the tank.
Also, my new build is a bit of a the bigger the better kind of built. I learn from many mistakes I made in the past and I am trying to apply them here and believe it or not, even after so many months of planning I still have things I would have done differently but I am sure you know what I mean considering you have been looking after fish for almost half of my life!!
Anyway moving on a bit, I got the current meter today in the post, so I decided to build the circuit breaker box and test it and I am very happy with the results.
Now the Apex power bars can also measure current/amps but I am not going to be running everything through those bars, some stuff will not go on them. I also had a look at my apartments electrical wiring/setup, each zone has 20A circuit breakers/RCBs, which means approximately 4000 watts per socket maximum. I calculated the probably total wattage of my aquarium and it will be close to 2000 watts so my plan is to split that, and to do that all I have to do is drill the wall and pass a cable to the adjacent room which is controlled by another RCB/CB giving me another 20A.
In all fairness I could run (and will for a while) everything on one socket, as there is nothing else connected to those sockets/zone except for the TV but it is not only about spreading the load, it is also in case that there is a short on one of the areas I could always use the current from the other one. Just as a safety measure.
Anyway back to the point, the Circuit box mission is primarily as an RCBO and to avoid electrocution (only things I have that are not 12v are my lights and the heaters).
There will be a second plug without a CC but with an RCB connected directly to the wall (this is the one that will go to the adjacent room in the future if necessary). IT will also have a wattage meter but I will work on installing that at a later stage.
Anyway here it is! My first Circuit box
")


I will probably get cracking with the electricals this week and finish it off, bed time now!
Chat later
Please Log in to join the conversation.
- robert (robert carter)
- Offline
- Platinum Member
-
- Posts: 1689
- Thank you received: 113
Please Log in to join the conversation.
- Bohrio (Alex Rodriguez)
-
Topic Author
- Offline
- Premium Member
-
- Posts: 540
- Thank you received: 54
Of course not, I use to have tropicals tanks as well, but the wife made me chose between tropicals and marine and went for Marine. Been building this tank since!
Keeping marine is not much more difficult to keep than freshwater, just more expensive! lol
Please Log in to join the conversation.
- robert (robert carter)
- Offline
- Platinum Member
-
- Posts: 1689
- Thank you received: 113
Please Log in to join the conversation.
- hammie (Neil Hammerton)
-
- Offline
- Platinum Member
-
- Posts: 1204
- Thank you received: 184
Tho I only ever asked permission for 1 tank out of my current 5
Please Log in to join the conversation.
- Jonlate (Jon Late)
-

- Offline
- Senior Member
-

- Posts: 439
- Thank you received: 38
Please Log in to join the conversation.
- Bohrio (Alex Rodriguez)
-
Topic Author
- Offline
- Premium Member
-
- Posts: 540
- Thank you received: 54

Pretty decent little camera that I will use to monitor the aquarium while away... although it might have other uses lol
I am getting another one for the sump.
Quality is excellent and it pretty much has everything I need including IR and remote access protocols.
Also, my reef background is now officially in the oven and it should be ready by friday. Torsten (the guy I was in contact with in Korallentwelt) has told me he will be sending me some pictures on monday.
The way it works is that you send them s design or draft, then they get a guy to work on this for a few days and build it for you, he takes a few pictures and send them to you, then I tell him to remove/add whatever I feel is missing etc, he takes more pics and again until I am happy with the layout. Very impressive service I have to say, and not as expensive as people might think...
So first you start with the background. I tried several designs, my first drafts were like this:
URL=http://s1379.photobucket.com/user/bohrio/media/FreshPaint-7-2016.02.21-10.12.29_zpsvo6ddoyy.png.html]

But in the end and as I am getting rid off the fridge on the right I decided I wanted to leave the right wall fully open so people will see this first when they come into the living room.

The two "wholes" in the left and right of the wall is the spot where the gyres will go, kind of camouflaged or hidden from plain sight.
So on monday I will get some pics and I will have a glimpse of how the aquarium looks like. Personally I think this deserves a separate thread so I wont go much into detail and just focus on my aquarium.
Just so you get an idea of how the wall is going to look like here you go:

Now mine wont be as thick (this aquarium is smaller than mine) and the right side wont be so "chunky", the reason why is so chunky is because it is hiding the overflow.
So if you imagine a wall similar to this with more pieces in between creating islands of some sort or even small peninsulas you get something like this

Now this is a 230 cm wide tank so just imagine a tank around 25% shorter!
")
Please Log in to join the conversation.
- Bohrio (Alex Rodriguez)
-
Topic Author
- Offline
- Premium Member
-
- Posts: 540
- Thank you received: 54
As I said the gyres will be disguised using the background as well, something like this

You can see the circular or better said cylindrical "caves" on BOTH sides of the design/wall.
Once you look at it from the front it is almost invisible

Anyway enough for today, more stuff on monday!
Please Log in to join the conversation.
- Jonlate (Jon Late)
-
- Offline
- Senior Member
-
- Posts: 439
- Thank you received: 38
I looks an interesting process, but why go this way not natural rock? ( you can answer that in your new thread)
Please Log in to join the conversation.
- Bohrio (Alex Rodriguez)
-
Topic Author
- Offline
- Premium Member
-
- Posts: 540
- Thank you received: 54
Well there is no major difference in regards filtration power between good grade reef rock such as Fiji or Tonga and korallenwelt reef rock.
So aside from saving the planet and not using real ocean rock which could be reason enough for some, my main reason is that I can make whatever landscape I want without much of an issue, just tell the what I want and voila. Second this rock comes with no organic matter, etc, therefore there is no risk of ammonia spikes or even major phosphate leaching! which you would get if you were using dead rock. This rock only needs to be treated for a day just to wash up some of the dust created after the "cooking" process and thats it.
Also, it is very very very very hard to get anyone to send you cured dead rock, such as Marco rocks or similar. There are a couple of places in UK that can do this but when I asked them for a quote they just ignored me, either they though I was joking or were just not interested at all.
Places such as SH can get you dead rock, which would need to be cured for a few weeks, months, they could potentially get you some man made reef rock but again, you would be getting random rocks so it would be really hard to find exactly what you are looking for. In the end, it is just not only pleasing to the eye but also easy to get, and it "only" costs around 80 euro to send it.
Please Log in to join the conversation.
- carlowchris (chris)
-
- Offline
- Premium Member
-
- Posts: 640
- Thank you received: 70
Please Log in to join the conversation.
- Jonlate (Jon Late)
-
- Offline
- Senior Member
-
- Posts: 439
- Thank you received: 38
Well done Chris, mentioning a change of mind. Anyone would think Alex changes his mind a lot. But...How many times did you change your mind in designing it? I am surprised Bart even answers the phone to you any more.
Please Log in to join the conversation.
- carlowchris (chris)
-
- Offline
- Premium Member
-
- Posts: 640
- Thank you received: 70
With the background covering the the whole of Two sides of the tank...there will be a void that crap can basicly settle in...How's ya going to deal with that???
Please Log in to join the conversation.
- Bohrio (Alex Rodriguez)
-
Topic Author
- Offline
- Premium Member
-
- Posts: 540
- Thank you received: 54
Did a test run with the tank, the bean animal overflow works great, no noise whatsoever.
The buzzing noise on the back is the america fridge which will be gone soon. The water noise is the gyre creating the surface agitation on one side of the tank.
This is a look of the overflow, the pipes are a couple of cm higher, to reduce the distance between the overflow water line and the weird.
Bart is going to hate me even more next week, we need to re built the return line to the tank. Too much pressure coming out of that 25 mm pipe. We need to add another 32 mm which means using 40 mm pipes from the pump.
This flow burst is affecting the pump performance, measured the flow rate of the pump today, I got round 1300 @ 65% and 2400 @ 99%. That's from the sump to the tank and thats on a Blau 12000 lph DC pump... not good and at this point the pump is making quite a bit of noise.
I thought it was a problem with the design itself but no, I connected a 25 mm hose straight into the pump and got 3600 lph.
So not good, the problem is the width of the outlet/piping. Its only 16 mm. I removed it and used the 25 mm tube and the pressure increased to 4000 lph. But that's as good as it gets. I am afraid I will need to increase the diameter to at least 32 mm (30 mm effectively). Which would mean installing a 40 mm pipe at the beginning, Tee everything off that using reductors (like 25 mm to feed each side of the sump, and then split what is coming into the aquarium into 1 25 mm (current pipe) and a new 32 mm (going to the side of the aquarium).
Not too much work but this should give me enough room to run at least 5000 lph through those pipes without creating that jet stream flow that I am currently creating. But I will need to think about this carefully now.
Also the tank is much noisier when running like this, I did a test run in the tank with no restrictor/connectors and it was much much quieter.
Anyway I will keep you posted!
PS: Just did another test, and corrected some outputs from the original post as I had mixed up a couple of results.
So here we go, run the pump from the sump straight into a 25 l container.
Pump with the original connection (inside diameter 16mm) no piping just a 25 mm tube straight into the bucket.
25 liters in 24 seconds, flow rate = 3600 lph
Second test now, removed the first restriction and cut it to the second "notch" which means that the aperture is now approx 20 mm inside diameter, same tubing (25 mm), thats a 20% increase in diameter
25 liters in 18 seconds, flow rate = 5000 lph, thats a 28% increase.
Pretty impressive.
I will love to test this with a bigger diameter tubing or piping but this is all I can do for the moment. 32 mm pipes should give me around 30 mm internal diameter which should be around 50% diameter increase and probably around 70 %, or 8500 lph at the base. If I go for 40 which has 38 mm inside diameter thats a 22% increase in diameter and probably around 10000 lph. Things are harder to calculate as the flow rate is not proportional to the diameter but slightly higher but it is a good approximation I think.
Please Log in to join the conversation.
- Bohrio (Alex Rodriguez)
-
Topic Author
- Offline
- Premium Member
-
- Posts: 540
- Thank you received: 54
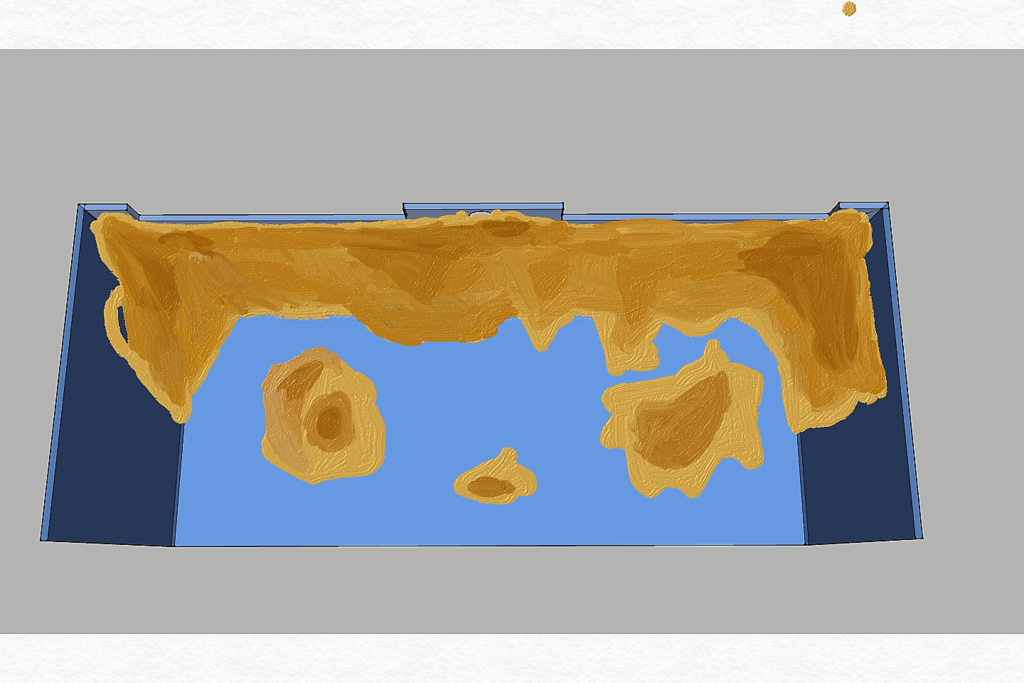
This brings me to my next part, I got some pictures from Torsten (Korallenwelt), very happy with the result. I was expecting the right side to be smaller, I might modify when I am putting everything together.
I am missing middle structures, he is going to pick up a few and take more pictures until I am happy with the end result.
You can see where the gyres will go and how easy will be to remove and clean, the structure is 48 x 157 x 30 cm (left - back wall - right) and around 50 cm high for the back wall and 60 cm for the sides. The wholes and missing gaps are then covered by mortar (kind of a cement).


From the back wall to the front I have over 52-56 cm of sand which its perfect for me. Guess it will look better in the aquarium.
Please Log in to join the conversation.
- Bohrio (Alex Rodriguez)
-
Topic Author
- Offline
- Premium Member
-
- Posts: 540
- Thank you received: 54
Some news, first, Torsten sent me a few more more designs


This is another design, a bit more space on the right of the aquarium


We are still working on it, I like them but I feel they might be a bit too crowded when corals grow a bit. But things are definitively going in the right direction
Tomorrow more designs!
Also, regarding the piping design and after reading a lot about return designs I decided we are going to split the return in two pumps, although I will have the posibility of running it with both if necessary (for instance pump failure) they will be independent originally. The bigger pump 12k will feed the tank and the UV/refugium and the other the rest (reactors etc).
So Bart rang me today and he said that as we want to put a lot of flow in the tank it would be better to do the overflow again, drill bigger wholes so instead of 3 x 32 mm drains and 1 x 25 mm return we will make 3 x 40 mm drains and 1 40 mm return. The 40 mm drain (the most important one is the emergency drain) should be able to drain the entire return flow. I am planning on running around 5000 lph on the tank, a 40 mm drain should be able to handle around 8000 lph more than enough for what I need.
Best thing about the other 2 drains (who I might bring to 32 mm diameter instead of 40 mm) is the amount of flow they can handle in full siphon. For instance, a 40 mm pipe can handle around 8000 lph of gravity fed flow. However, a full siphon 40 mm pipe can handle around 22000 lph! Here is the reason why I might leave it on 32 mm, which would handle around 16000 lph of flow. Almost double of what I am aiming for. There is no point in going any lower than that as a 1" full siphon pipe can theoretically handle around 9000 lph of flow which would be very close to what I am aiming for and leave very little room for margin.
Anyway I will let you know of what I decide to do in the end, Bart will ring me tomorrow and we will decide then whether we want 3 or 4 40 mm etc. Personally I am thinking we could got for 3 x 40 mm drains and use 2 x 32 restrictors but I dont see a point in using restrictors as my tank will never need to handle flows higher than 8000 lph so 2 x 32 mm and 1 x 40 mm drain should be enough, then 1 x 40 mm return split into 1 x 32 mm outlet and 1 x 25 mm outlet to reuse the 25 mm whole in the middle of the tank. Now we are only talking about doing the bottom of the overflow, not the back of the tank!
I will keep you posted!
Please Log in to join the conversation.
- carlowchris (chris)
-
- Offline
- Premium Member
-
- Posts: 640
- Thank you received: 70
Even if there not needed why not drill two new returns and larger drains ....it would reduce the need for a splitt and the larger drains would almost future proof the tank....
Cap off and use reducers now but very handy should you need them there in the future.
Please Log in to join the conversation.
- Bohrio (Alex Rodriguez)
-
Topic Author
- Offline
- Premium Member
-
- Posts: 540
- Thank you received: 54
That's it. Just the bottom of the overflow, not a big deal tbh.
I could over do it a bit and drill 40 mm.. but then again when will I be running 22000 lph in my sump... I just can't think of a situation where I would want to do this. The emergency drain however thats a different thing, I should go as big as I want, so 40 mm is the minimum I would go. Finding pipe bigger than that would be hard. So, if a gravity fed 40 mm pipe can take around 8000-9000 lph that is as high as I want to run the flow in my sump, higher than that would be dangerous as, in the very unlikely event of both siphons failing (primary and secondary) I need the flow to never exceed the maximum that the emergency drain can handle otherwise a flood will occur, unless I create some sort of level switch that would lower the power of the pump to decrease the flow.
Like I know what you are saying, and I feel the same, I mean, I am gonna have to drill 2 x 40 mm so why not all of them!
I will see anyway when the time comes I might do 4 x 40 mm and forget about it
Please Log in to join the conversation.
- jeff (Jeff Scully)
-

- Offline
- Platinum Member
-
- Posts: 1461
- Thank you received: 204
I think lots of flow in the tank and slow flow threw the sump for the macanical stuff in their to do their job is better
Skimmer example, should be able to turn the sump around before it go's back into the tank, after the skimmer does its job the other po4 no3 carbon reactors sort the rest of the mess out
The slower the return pump is the cleaner the water is getting pumped back in and that means the less the live rock has to work, their for the lr is not getting over worked and matures better
Where the tongue slips, it speaks the truth.
A life making mistakes is not only more honourable, but more useful than a life spent doing nothing at all.
Please Log in to join the conversation.
- Bohrio (Alex Rodriguez)
-
Topic Author
- Offline
- Premium Member
-
- Posts: 540
- Thank you received: 54
You are right, but there are pros and cons in whether using slow/high flow rates in a sump.
I like having the option to use them both if I want to. I chose relatively high flows (around 5-7x turnover) just to maximize the efficiency of the beananimal design. Full siphon requires high flows.
For instance, you said slow flow will give the skimmer more time to skim, but some people think that, if, lets say you have a skimmer with a pump rated for 1000 lph and you are running 500 lph, effectively, there is a chance that some of the water you are skimming has already been skimmed. But, if you increase the rate to 1000 lph you will be matching the recommended speed, which means you will skim new "dirty" water but at the same time still skim already skimmed water. Now, what would happen if you increase the flow to 2000 lph, well, nothing really, the skimmer will still skim 1000 l of water per hour, it will mean that some of the water passing through will not be skimmed but thats fine, but in reality, this will always be the case anyway as you cannot force the entire water in the sump to go through the skimmer and you are always going to miss bits anyway. An external skimmer gives you better control over skimming but I dont like having stuff outside my aquarium's sump! So basically, more flow means less chance of double-skimming.
Another reason why higher flows are not bad is to avoid detritus to settle in the sump and to "stick" to your mechanical filters or even to go to your skimmer. Some of them might go back to the tank but if your tank has good flow as well most of them will end up in the sump again at some point.
I am planning on running around 5000 lph through my sump, my skimmer pump is rated for 4000 lph, it should be ok, but if I need to reduce the flow for any reason I can do it no problem. Also, my plan is to remove the skimmer as soon as the algae scrubber starts to work, leaving me a lot of extra space in the sump.
My reactors will be feed by a separate pump so I can adjust the flow as I feel needed.
In conclusion, I dont know if it will work or not. I have used slow flow sumps in the past with mixed results (well only one), personally I would like to see this one running. Like I said, worse case scenario I will lower the flow in the tank, best case scenario I will leave it as it is.
In the future, once I remove the skimmer I want to try the roller matt, which will force me to slow down the flow to 3000 lph. Still that's around 5x turnover, still high enough flow.
Just consider me a guinea pig, but I rather plan in excess than not.
Funny enough is that I might be moving houses in a few years, so this might be another learning point for my next tank... and this one will be a big one! but that's another story, I rather just focus on this one for the moment
Please Log in to join the conversation.
- Bohrio (Alex Rodriguez)
-
Topic Author
- Offline
- Premium Member
-
- Posts: 540
- Thank you received: 54
Just a quick update, after a bit of thinking I have decided that I will not redo the overflow box. Reason is that I found a way around it.
So the main reason for me to redo it was to get a bigger emergency drain so it would be able to handle around 5000 lph and to increase the return pipe size for a higher and more gentle flow (allowing me to reach flows of up to 6000 lph although I am aiming at 4000-5000 lph initially).
So the solution is simple enough, I will use the current 25 mm return as a second emergency drain and put 2 new 32 mm pipes coming up behind the tank one on each side, not visible from the outside.
Funny enough using this "second" 25 mm pipe will give me more margin than if I was using a 40 mm pipe, the 25 mm and the 32 mm will give me a total flow of around 6000 lph. Giving me plenty of room
I think this is the best solution, it is possible that I might lower the flow down to 3000 lph in the future so if this is the case, This workaround will even allow me to use that 25 mm return as a 3rd return with only a small modification (could be useful in the event of a pump failure while I am on holidays... I dont know.
Anyway, lots of stuff will be arriving this week and next one. Background is finished and should be on its way soon. This means that the tank could be up and running before the end of the month, then I can start cycling it
Please Log in to join the conversation.
- carlowchris (chris)
-
- Offline
- Premium Member
-
- Posts: 640
- Thank you received: 70
Have a look at lafishguy..who did that...and he never solved his algae issues....you won't remove enough stuff with the scrubbers alone....
He has since rebuilt another tank and has a scrubber and a skimmer on it.
Please Log in to join the conversation.
- robert (robert carter)
- Offline
- Platinum Member
-
- Posts: 1689
- Thank you received: 113
Please Log in to join the conversation.
- Bohrio (Alex Rodriguez)
-
Topic Author
- Offline
- Premium Member
-
- Posts: 540
- Thank you received: 54
Thanks for your advice
I am not planning on removing the skimmer straight away, I will add the scrubber and see, if the scrubber is working as expected there will be very little to skim and then I can make a judgement call on whether or not to remove it.
In theory, once the scrubber is fully working and you have it set up according to your tank/feeding it should be more than enough to handle it.
Anyway I am not worrid about that, I really just want to see how good algae scrubbers are, so is a bit of a test run for me
Robert, costs are variable, it really depends, I am sure you can buy an aquarium for less than half of what this one costs.
In fact, if you are going to marine I suggest one of those red sea reef ones, the new ones with rimless tops, lovely tanks IMO or so I have heard and they re avaiable for around 1300 euro or so if I am not incorrect
Come to the salty side Robert...
Please Log in to join the conversation.
- Bohrio (Alex Rodriguez)
-
Topic Author
- Offline
- Premium Member
-
- Posts: 540
- Thank you received: 54
The apex is here, barely had time today to turn it on and mess with the on line stuff... that's about it.
Its missing the leak detector, ORP probe and something else I can't remember, no need for it now though.
Good news is that at least now I can finish my electrical installation!

The lights are almost here and the background will be shipped tomorrow I think so great news. I really dont know where am I gonna get the time to do all this this month. First thing is still working on the return though. Hopefully it will be ready next week.
Please Log in to join the conversation.
- carlowchris (chris)
-
- Offline
- Premium Member
-
- Posts: 640
- Thank you received: 70
What lights did you order in the end??
Please Log in to join the conversation.
- Bohrio (Alex Rodriguez)
-
Topic Author
- Offline
- Premium Member
-
- Posts: 540
- Thank you received: 54
Actually no, I got them from Seahorse. It took over a week to get here but they did it. Daniel really look well after me as usual.
There are a couple of providers in the UK who sell it (h20aquatics and marineaquatics I think) but I just preferred to buy them of SH, in case something goes wrong but also because I like them.
The lights are a surprise
All I can say is that they are not the common choice. Please Log in to join the conversation.